

You've probably found yourself propping your phone against random objects while watching videos or making video calls. Instead of settling for makeshift solutions, you can create your own phone pillow stand that's both functional and decorative. This simple sewing project requires basic materials you likely have at home, and you'll end up with a sturdy, custom-made stand that keeps your device at the perfect viewing angle. Let's explore how to craft this practical accessory step by step.
Key Takeaways
- Cut a 20x25 cm piece of durable cotton or linen fabric, pre-wash it, and press to remove wrinkles.
- Fold and sew the fabric edges with a 2cm seam allowance, leaving one side open for filling.
- Add polyester stuffing for cushioning.
- Create decorative stitching along the edges for aesthetic appeal and added structural support.
- Close the opening with a 1-inch seam allowance, trim excess fabric, and press seams for a polished finish.
Materials Needed
Before diving into the sewing, let’s gather all the materials you’ll need for this project:
- Fabric: Choose a sturdy fabric like quilting cotton or canvas. A rectangle piece of fabric measuring 20x25cm is ideal.
- Stuffing: You can use polyester fill, rice, or even beans as stuffing for weight and stability.
- Sewing Tools: Scissors, ruler, washable marker or chalk, needle and thread or a sewing machine, pins, tape (optional for holding fabric in place)
How to Make a Phone Pillow Holder: Step-by-Step Instructions
You'll start the phone pillow stand project by folding your pre-cut fabric and sewing three sides with a secure backstitch, leaving one short end open for filling.
Next, you'll turn the fabric right side out, press the seams flat, and add a decorative topstitch if desired to enhance the pillow's appearance.
Finally, you'll measure and fold the bottom section to create the phone-holding angle, sewing it in place after testing the stability with your device.
Step 1: Fold and Sew the Fabric
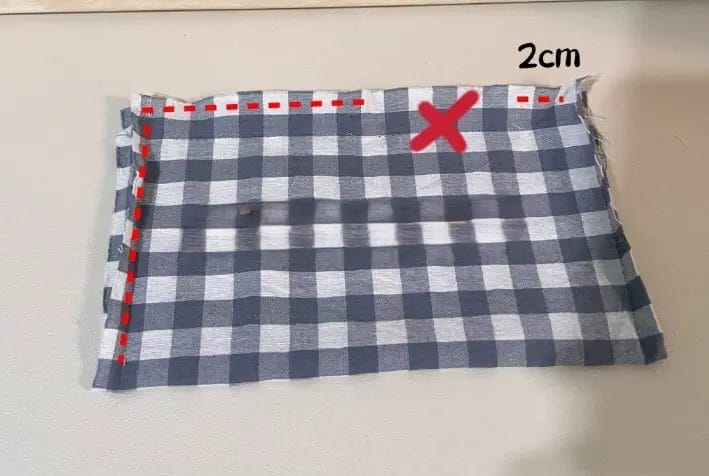
Start by taking your fabric and folding the fabric in half along the long edge.
This will create a rectangular piece that is easier to work with. Use a ruler to measure precisely and a marker to draw a line where you’ll sew.
Make sure to leave a gap of about 2cm on one of the longer sides for turning the fabric right side out later.
Step 2: Sew the Remaining Side
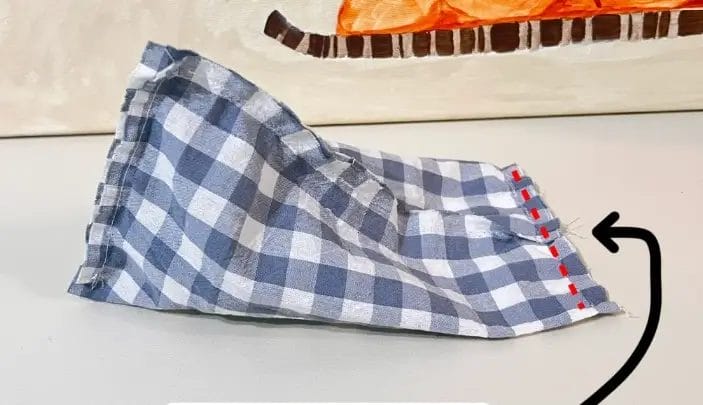
Continuing with the remaining side, pin the fabric's open edges together.
To sew a phone holder that's sturdy, stitch along the pinned edge, being sure to backstitch at both ends.
Step 3: Turn the Fabric Right Side Out
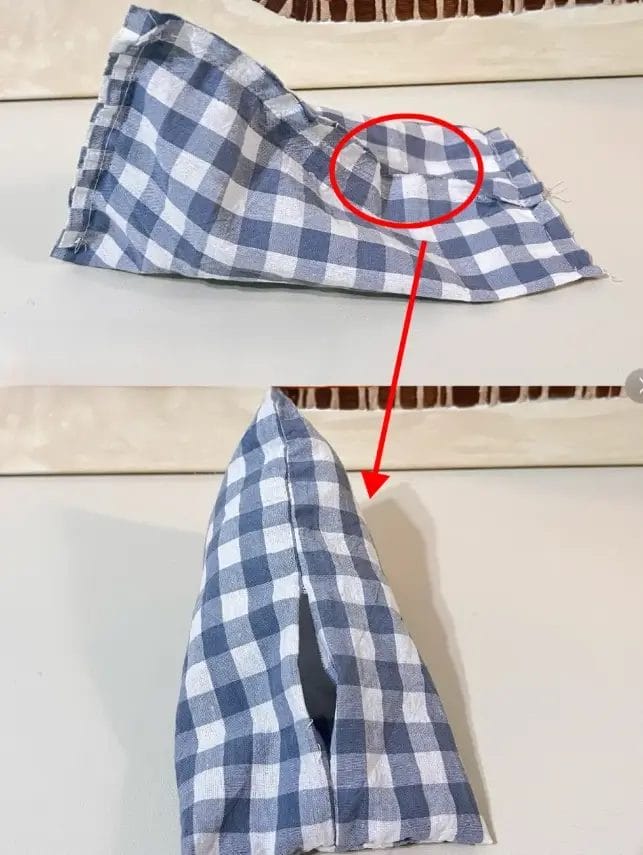
After sewing the sides, it’s time to turn the fabric right side out. Gently pull the fabric through the opening, taking care to maintain the shape as you work.
If you have a point turner, use it to push out the corners for sharp, defined edges. Otherwise, use your fingers to carefully work the fabric outward.
Before moving on to fill your stand, check the interior for any loose threads and remove them. Your fabric should now be properly turned with neat, well-defined corners.
Step 4: Create a Decorative Stitch
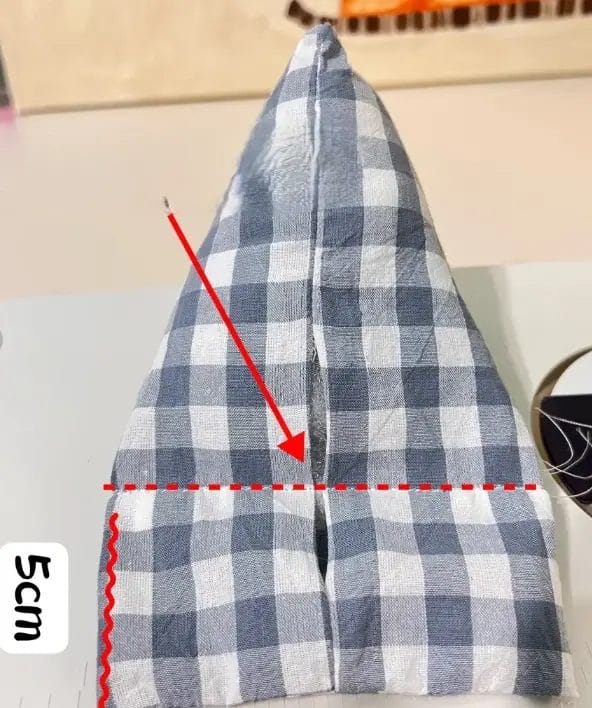
Now, using a ruler, measure and draw a line about 5cm from the bottom edge of your pillow stand. This line will serve as a guide for your next stitch, creating a decorative element while also helping to hold the stuffing in place.
Step 5: Fold and Sew the Bottom
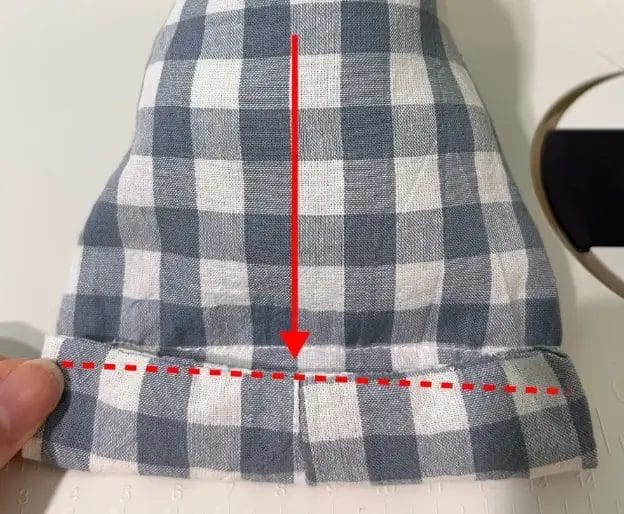
To create the base of your phone pillow, fold the bottom of the fabric along the line you just drew. Pin it in place and sew along the edge to secure it. This step creates a pocket-like area that will hold the stuffing and give your pillow structure.
Step 6: Stuff the Pillow Stand
Now comes the fun part—fill your phone pillow stand!
Using the gap left open, fill the pillow with your chosen stuffing. If you’re using rice or beans, add them slowly to avoid overfilling.
Make sure to distribute the weight evenly. If you prefer a lighter option, polyester fill works great too.
Step 7: Close the Openings
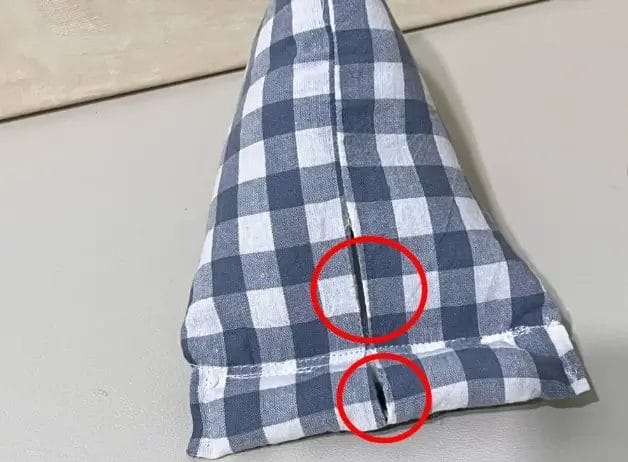
Once you’ve reached your desired amount of stuffing, it’s time to close the gap.
Tuck in the raw edges of the fabric and pin it shut. Using a needle and thread, hand-sew the opening closed with a neat stitch to ensure the stuffing stays in place.
If you prefer a more polished look, you can also sew the gap closed using your sewing machine.
After closing the pillow, take a moment to check the overall shape. If the pillow stand is uneven, you can gently reshape it by redistributing the stuffing.
Once you’re happy with the shape, you can give it one final press with an iron to finish.
Frequently Asked Questions
How to Make a Phone Stand Step by Step?
You'll need to cut a fabric piece, fold and press edges, sew sides leaving an opening, turn right-side out, fill with rice and polyester stuffing, then sew closed for a stable stand.
How to Sew a Pillow Shut?
Fold your raw edges inward, pin them together, and stitch along the edge with a 1-inch seam allowance. Don't forget to backstitch at both ends. Trim excess corner fabric for a neat finish.
What to Use Instead of a Phone Stand?
You can use everyday items as phone stands: try a rolled-up towel, a sturdy book propped on its spine, a decorative planter, a binder clip attached to your desk, or a modified cardboard tube for viewing support.
Conclusion
You've successfully created a functional and stylish phone pillow stand. Double-check that all seams are secure and the rice provides adequate stability for your device. The pillow should sit flat without tipping when your phone is placed on it. If needed, adjust the stuffing distribution for optimal balance. Your handmade phone stand is now ready to use, keeping your device at the perfect viewing angle.
0 comments