

In today’s digital age, spending hours at the computer has become commonplace, and with that comes the need for comfort and support. A mouse wrist cushion can significantly enhance your computing experience by providing ergonomic support to your wrists, reducing strain and discomfort. Now I’ll guide you through the process of creating your very own DIY mouse pad wrist rest. This project is easy to make and a great way to upcycle scrap fabric you may already have at home.
Key Takeaways
- Accurate cutting and preparation of fabric pieces are crucial for achieving a well-fitted and comfortable wrist cushion.
- Maintain a seam allowance, use the right sides together, and properly turn the fabric to achieve a polished finish.
- You can personalize your wrist cushions with various fabric patterns and colors, allowing for unique creations that fit own style.
- The finished mouse wrist cushion provides ergonomic support for the wrist, enhancing comfort during prolonged computer use and helping to prevent strain.
Materials Needed

Before we dive into the sewing, here’s what you’ll need for this project:
- Pillow-shaped hard cardboard template: 8x12cm
-
Fabric:
- 3 pieces for the outer cover (cotton works well)
- 2 pieces for the inner cushion
- Wrist strap fabric: 5x25cm
- Elastic band: 12cm
- PP cotton filling or rice (for weight)
- Scissors: For cutting fabric
- Sewing machine or needle and thread: For stitching
- Fabric pen: To mark the fabric
- Pins: To hold fabric pieces together
How to Make a Mouse Wrist Pad: Step-by-Step Tutorial
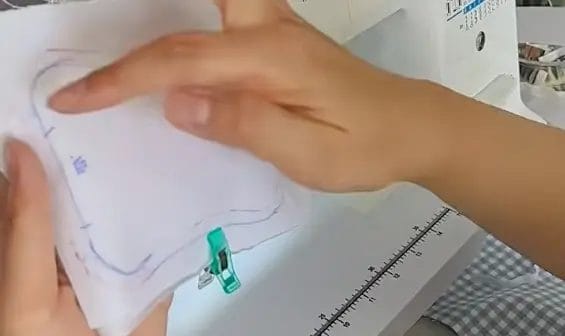
Step 1: Prepare the Fabric
Start by laying out your fabric pieces. Using the template, trace the shapes required for the three outer pieces and two inner cushion pieces onto your fabric with a fabric pen. Be sure to cut along the traced lines accurately to ensure a proper fit. This is crucial for the overall look and comfort of your wrist cushion.
Step 2: Sew the Inner Cushion
Take the two pieces designated for the inner cushion and place them right sides together. Using your sewing machine, stitch along the edges, leaving a small opening for turning and filling. Make sure to maintain a seam allowance of about 1cm. After sewing, trim any excess fabric and create notches along the curved edges to help reduce bulk when turning it right side out.
Step 3: Turn and Fill the Cushion

Now, reach through the opening you left and turn the inner cushion right side out. Use a pencil or chopstick to gently poke out the corners and ensure the edges are crisp. Once it’s turned, it’s time to fill the cushion with your chosen material—either PP cotton for a soft feel or rice for added weight. Distribute the filling evenly to maintain the cushion's shape. Once filled, stitch close the opening securely to keep the stuffing in place.
Step 4: Prepare the Wrist Strap
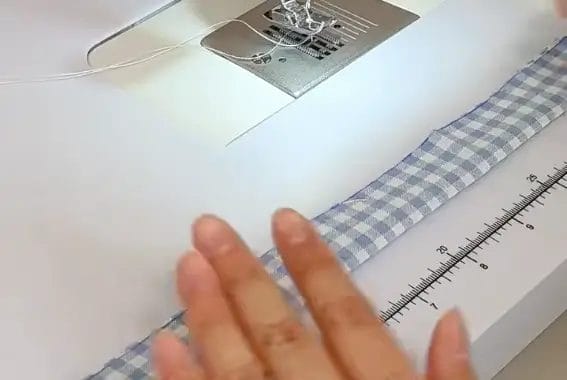
Next, take your wrist strap fabric (5x25cm) and fold it in half lengthwise. Sew along the long edge, leaving the ends open. After sewing, turn the strap right side out, making sure to push out the corners for a crisp finish.
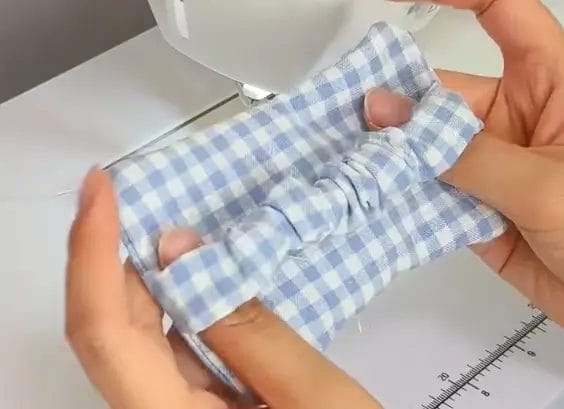
At this point, take your 12cm elastic band and insert it into the strap. Use clips to hold the elastic in place on both sides of the strap while you work. This will ensure that the elastic is securely positioned within the strap. Once the elastic is in place, you can continue to the next steps of the project.
Step 5: Attach the Wrist Strap

With the strap prepared, take one of the outer fabric pieces and align the wrist strap in the center. Pin it in place and sew it securely to the fabric. This will ensure that your wrist cushion has a comfortable resting area while using your mouse.
Step 6: Prepare the Backing Fabric
For the remaining outer pieces, you’ll want to cut them to size and fold the edges over about 0.5cm to create a clean seam. Stitch along this folded edge to prevent fraying. This step is important for maintaining a neat appearance and increasing durability.
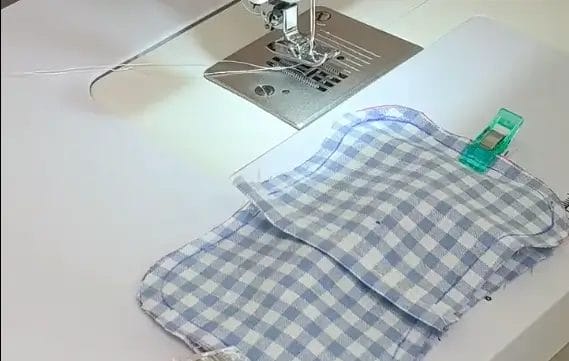
Step 7: Assemble the Cushion Cover
Now it’s time to put it all together. Place the piece with the wrist strap on top, followed by the two backing pieces. Make sure all the right sides are together. Pin the edges and sew around. As you sew, ensure to maintain the seam allowance and keep the fabric taut.
Step 8: Final Assembly
After sewing, turn the entire cushion cover right side out through the opening. Push out the corners gently to ensure a nice finish. At this point, you can insert the filled inner cushion into the cover. Make sure it fits snugly.
Conclusion
Congratulations! You’ve successfully made your own mouse wrist cushion. Not only does it provide ergonomic support while you work or play, but it also adds a personal touch to your workspace. By using scrap fabric, you’ve also engaged in a sustainable crafting practice.
Feel free to personalize your wrist cushion with different fabric patterns or embellishments. This is a super simple project that can be completed in just a few hours, making it a perfect DIY for beginners or experienced crafters alike.
FAQ
Can I use different types of fabric for this project?
Absolutely! You can use any durable fabric, such as cotton, canvas, or even upholstery fabric for a more robust wrist cushion.
How can I customize my wrist cushion?
Feel free to experiment with different fabric patterns, colors, and even add embellishments like buttons or embroidery for a personal touch.
What filling should I use?
You can use PP cotton for a soft cushion or rice for added weight. Both options provide comfort; it just depends on your preference.
Is this project suitable for beginners?
Yes! The instructions are straightforward and designed for crafters of all skill levels. It’s a great way to practice sewing skills.
How do I clean my mouse wrist cushion?
If you used washable fabric, you can spot clean it or remove the inner cushion and wash the outer cover as needed.
0 comments