

You'll love creating this charming fabric Christmas tree that adds a cozy, handmade touch to your holiday decor. With just basic sewing skills and common craft supplies, you can transform simple fabric scraps into a festive decoration that'll last for years. Whether you're looking for a unique centerpiece or a heartfelt gift, this DIY project combines traditional holiday charm with your personal creative flair. Let's explore how to bring this whimsical tree to life.
Key Takeaways
- Cut cardboard into a 24-inch tall cone shape and secure edges with tape or hot glue for the tree base.
- Cut fabric scraps into 2x4 inch pieces, choosing coordinating colors and natural fabrics for an elegant appearance.
- Stack and sew three tree-shaped fabric pieces together, leaving a small opening for stuffing with cotton filling.
- Fill the fabric tree with polyester fiberfill using pliers, paying special attention to corners and edges.
- Add decorative elements like bells, beads, and ribbons through strategically placed holes, securing with knots inside.
Gather Materials

Before you begin crafting your fabric Christmas tree, you'll need to gather a few essential materials: a sturdy piece of cardboard cut into a tree shape, your choice of festive fabric, sharp scissors, sewing needles with coordinating thread, and soft cotton filling.
You'll want to make sure your cardboard is thick enough to maintain the tree's shape while being easy enough to work with as your foundation.
Having all these items ready at your workspace will make the crafting process smooth and enjoyable, so take time to collect everything before you start.
Tree-shaped Cardboard
To create a fabric Christmas tree, you'll need a sturdy piece of tree-shaped cardboard.
Fabric
You'll need several fabric scraps in coordinating colors - think festive greens, reds, or whatever matches your holiday décor. Natural materials like linen work wonderfully and create an elegant look.
Scissors
Sharp fabric scissors are essential for creating clean cuts and precise edges on your tree. You'll want to use scissors specifically designed for fabric - don't grab those old kitchen shears!
Needles and Threads
Along with your fabric scissors, you'll need the right needles and thread to bring your handmade Christmas tree to life.
Choose a medium-sized needle that's sharp enough to pierce multiple fabric layers without damaging them. For thread, select a strong polyester or cotton blend that matches your fabric colors - green for the tree and various shades for decorative elements.
Cotton Filling
To give your fabric Christmas tree a plump, three-dimensional shape, you'll need plenty of cotton filling or polyester fiberfill.
Choose high-quality filling that's soft and fluffy to guarantee your stuffed Christmas tree maintains its shape. You'll want about 8-12 ounces of filling, depending on your tree's size.
Ribbons, Bells, and Beads
Now that your tree has its basic shape, you'll need an assortment of decorative materials to bring it to life! Gather small bells in silver or gold, festive ribbons in various widths, and sparkly beads that complement your fabric's color scheme.
These Christmas decorations will transform your creation into a stunning decor piece.
How to Make a DIY Handmade Fabric Christmas Tree
You'll begin this festive project by cutting six tree-shaped fabric pieces with 1cm seam allowance. Then, sew them in pairs with right sides facing each other, making certain to leave an opening.
After trimming seams and turning the pieces right side out, you'll stack and align three pieces together, sewing through the center to create your tree's dimensional shape.
Finally, you'll stuff your tree with cotton through the bottom opening, using pliers to guarantee even filling and achieve that perfect Christmas tree shape.
Step 1: Cut 6 Pieces of Tree-shaped Fabric with 1cm Seam Allowance
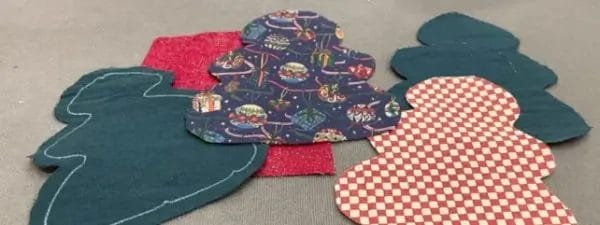
The first essential step in creating your fabric Christmas tree requires cutting six identical tree-shaped pieces from your chosen fabric, each with a 1cm seam allowance.
To achieve perfect tree-shaped slices:
- Draw a triangle template on paper, making sure it's symmetrical and has a wide base that tapers to a point - this will be your Christmas tree pattern.
- Pin your template securely to the fabric, adding 1cm around all edges for the seam allowance.
- Cut carefully along the marked lines, ensuring each slice is identical - you'll need all six pieces to match perfectly for easy fabric Christmas tree assembly.
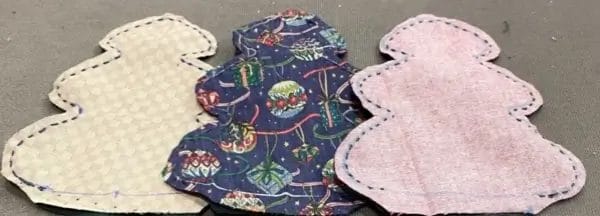
Step 2: Sew Two Pieces Together with Right Sides Facing, Leaving an Opening
After preparing your six identical tree-shaped fabric pieces, it's time to start bringing your Christmas tree to life through careful stitching.
Take two pieces and align them with right sides facing each other. Starting at the top point, sew along the edges with a 1cm seam allowance, but remember to leave a 3-inch opening at the bottom for turning and stuffing.
You'll repeat this process twice more with the remaining fabric pieces.
Don't worry if you're new to DIY projects - there's no glue involved in this step, just simple straight stitching that'll create three identical tree segments.
Step 3: Trim the Seam Allowance and Turn the Fabric Right Side Out

Once your tree segments are sewn together, it's time for some careful trimming and turning to achieve crisp, professional-looking edges.
You'll want to create clean lines that showcase your fabric print beautifully.
- Using sharp scissors, trim the seam allowance to about 1/4 inch, being extra careful around curves and points to reduce bulk.
- Clip the corners at an angle and make small notches along curved edges, ensuring they'll lay flat when turned.
- Gently turn each piece right side out through the opening you left, then use a point turner to push out corners until they're sharp.
Step 4: Align and Stack Three Pieces Together, Sewing Through the Center
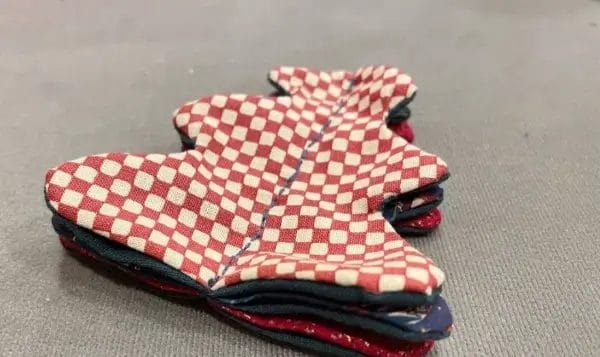
Now comes the exciting part where your tree starts taking shape! Take your three finished fabric pieces and stack them neatly on top of each other, making certain the points align perfectly.
You'll want to rotate each layer slightly so the points create an alternating pattern - this gives your Christmas tree that full, dimensional look.
Pin the layers together at the center point, then use your sewing machine to secure them with a straight stitch right through the middle.
Make several passes to guarantee it's sturdy. This central stitching creates the core structure that allows your tree pieces to fan out beautifully.
Step 5: Fill the Tree with Cotton from the Bottom Opening, Using Pliers for Better Filling
Your fabric tree's shape is ready for stuffing!
You'll want to carefully fill every nook and cranny with cotton to create that perfect Christmas tree silhouette. Grab your pliers - they'll be your best friend during this step.
- Start by pushing small amounts of cotton through the bottom opening using the pliers' handle.
- Stick the pliers deep into corners and edges to fill those hard-to-reach spots.
- Keep adding cotton until your tree feels firm but still maintains its gentle curves.
Don't rush this process - taking time to fill evenly will guarantee your tree stands beautifully and holds its shape for years to come.
Step 6: Hand Stitch the Opening Closed
After completing the stuffing process, it's time to seal your tree's bottom opening with some careful hand stitching.
Thread your tapestry needle with white thread that matches your fabric, and begin closing the gap using small, even stitches.
Work your way around the opening's edge, making sure each stitch is secure and nearly invisible from the outside. Pull the thread gently to create a smooth, gathered closure.
Once you've stitched the entire opening, tie off your thread with a double knot and trim the excess.
Now your handmade gift is ready for its finishing touches!
Step 7: Attach Ribbons, Bells, and Beads to Secure Them in Place
The final decorative elements will transform your fabric tree into a festive masterpiece!
To attach your decorations securely, you'll want to follow these essential steps:
- Create small holes in strategic spots using a pin, spacing them evenly around your tree for balanced decoration placement.
- Thread beads and bells onto thin ribbons, then carefully push the ribbon ends through the pinned holes.
- Tie secure knots on the inside of your tree to keep each decoration firmly in place, and trim any excess ribbon.
Now your fabric tree sparkles with personality!
These finishing touches add dimension and charm to your handmade creation.
Frequently Asked Questions
How Long Does This Fabric Christmas Tree Typically Last With Proper Storage?
You'll get 5-10 years from your fabric tree when you store it in a sealed plastic container, away from moisture and sunlight. It's durable and won't fade like artificial trees!
Can I Use a Hot Glue Gun Instead of Sewing?
Yes, you can use a hot glue gun! While sewing's more durable, hot glue works great for a quick project. Just be careful to apply small amounts and press firmly for secure bonds.
What's the Best Fabric Choice for Outdoor Display?
You'll want to use outdoor-rated canvas, polyester, or weather-treated cotton. They're water-resistant and durable. Don't forget to apply fabric protector spray for extra protection against rain and sun.
Is This Project Safe for Homes With Curious Pets?
You'll need to be cautious with pets around fabric trees. Secure all decorations tightly, avoid small embellishments they could swallow, and consider mounting it high or in a pet-free room.
How Do I Clean the Fabric Tree if It Gets Dusty?
You can lightly vacuum your fabric tree with a brush attachment, or gently wipe it with a damp microfiber cloth. For stubborn dust, use a fabric freshening spray and let it air dry.
Conclusion
You've created a charming fabric Christmas tree that'll brighten any holiday space! Don't forget to step back and admire your handiwork - from the perfectly stuffed fabric layers to those twinkling bells and ribbons. Whether it's gracing your own mantel or becoming someone's treasured gift, your handmade creation brings a personal touch to the season. Time to start planning your next one!
0 comments