

You'll find that creating your own fabric eye mask combines both practical utility and creative expression. This straightforward sewing project requires basic materials and moderate skill, yet delivers professional-quality results. By selecting your preferred fabrics and adding personal touches, you can craft a sleep accessory that perfectly matches your needs. The process involves several precise steps that transform simple materials into a comfortable, light-blocking mask.
Key Takeaways
- Cut two fabric pieces from your pattern: exterior cotton and interior silk/satin, with 1/4-inch seam allowance all around.
- Fold and sew a 50cm x 7cm fabric strip to create a soft band for the eye mask.
- Attach 34cm elastic band on opposite corners for comfortable, adjustable fit during sleep.
- Sew mask pieces right-sides-together, leaving a small opening for turning, then press and topstitch 3mm from edge.
- Personalize with embellishments like embroidery, lace trim, or fabric flowers, ensuring decorations won't interfere with comfort.
Materials Needed
- Eye mask pattern: Before starting your eye mask project, create your eye mask pattern.
- Two pieces of fabric: Your DIY eye mask requires two precisely-cut fabric pieces: one exterior piece made from soft cotton and one interior lining piece made from silk or satin.
- One long fabric strip (50x7 cm): Prepare a single continuous strip of fabric measuring 50 centimeters in length and 7 centimeters in width to make the eye mask band.
- 34 cm elastic band: The elastic should be flexible enough to stretch comfortably without being too loose or too tight.
DIY Fabric Eye Mask: A Step-by-Step Guide
You'll begin by cutting two eye-mask pieces using your pattern and creating a fabric tube by folding and sewing the long strip lengthwise.
Next, you'll thread your elastic band through the fabric tube and secure both ends with stitching.
Finally, you'll sandwich the elastic between your two mask pieces, ensuring the elastic ends align perfectly with the mask edges before sewing.
Step 1: Cut two eye-mask fabric pieces using the pattern.
Start by placing your paper pattern onto two separate pieces of fabric - the main fabric and the lining fabric.
Pin the pattern securely to prevent shifting while you cut.
Using sharp fabric scissors, cut precisely around the pattern's edges, leaving a 1/4-inch seam allowance.
Once complete, you should have 2 pieces total: one from your main fabric and another from your lining fabric.
Step 2: Fold the long fabric strip in half lengthwise and sew along the long edge to make a tube.

Now take your long fabric strip and fold it in half lengthwise, with right sides together.
Pin the edges to keep them aligned while you work. Using a straight stitch, sew along the long edge with a 1/4-inch seam allowance, leaving both short ends open.
Once you've sewn the entire length, turn the tube right side out by feeding it through itself using a safety pin or turning tool. Press the seam flat with an iron.
Step 3: Thread the elastic band through the fabric tube.
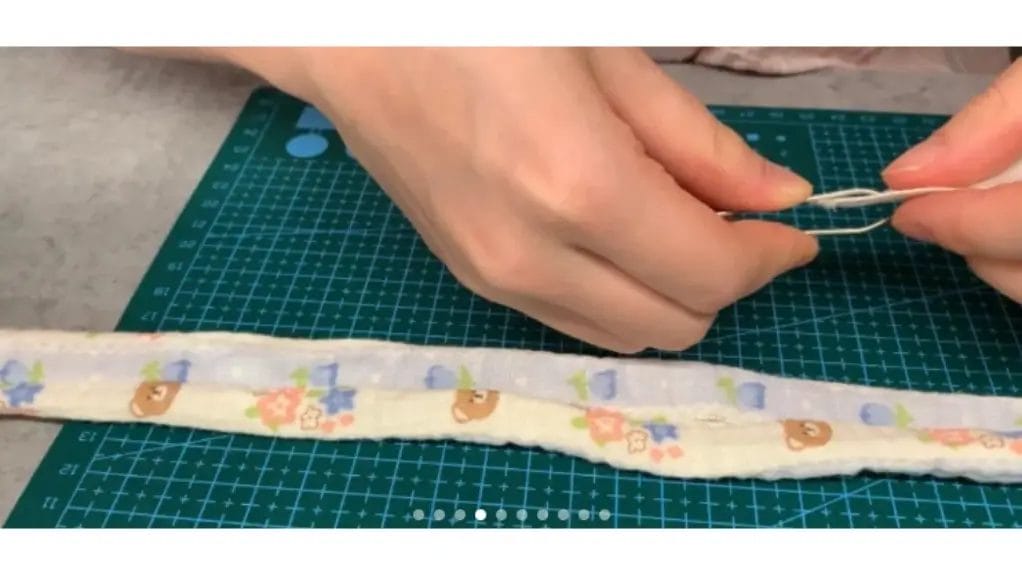
Now that your fabric tube is ready, threading the elastic band through requires careful attention to detail.
You'll need to maneuver the elastic through the narrow channel you've created to form the sides of the mask.
- Attach a safety pin to one edge of your elastic band.
- Insert the safety pin into one end of the fabric tube.
- Pull the elastic through gradually, ensuring it doesn't twist.
- Keep the other end of the elastic outside the tube to prevent losing it.
- Thread the elastic until both ends emerge from opposite sides of the mask.
Work slowly and maintain tension on both ends of the elastic to prevent tangling or bunching within the tube.
Step 4: Sew the ends of the long fabric strip.
Sew the two ends of the long fabric strip. Make sure the elastic is secure in the fabric tube.
Press the seam open with your iron to create a flat, professional finish.
If needed, adjust the elastic's tension by pulling the ends until you achieve your desired fit.
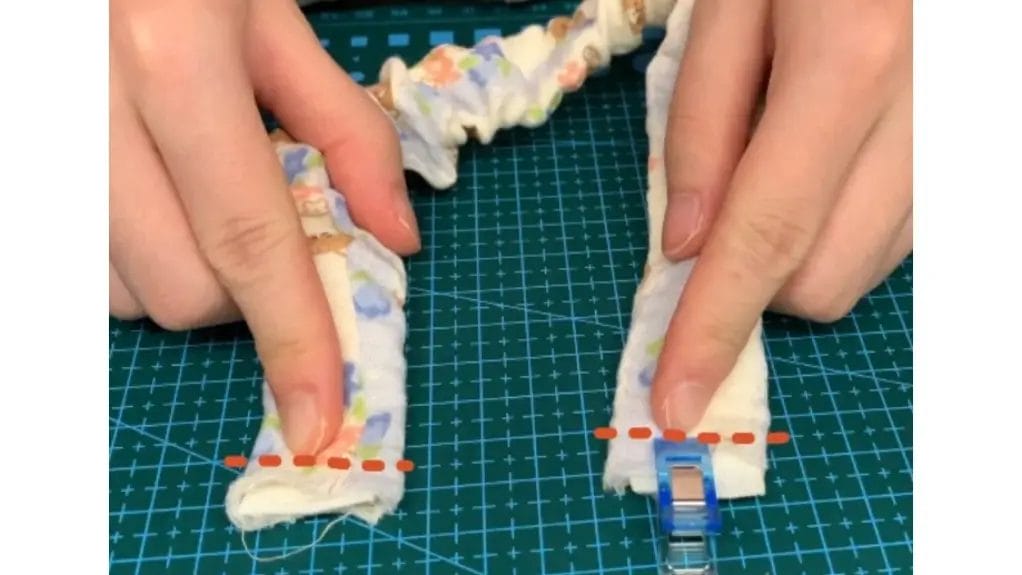
Step 5: Position the elastic between the two fabric pieces, aligning the ends with the mask edges.

Carefully sandwich the elastic band between your two main fabric pieces, with right sides facing inward. Position the ends of the elastic exactly at the mask edges, guaranteeing they're securely placed between the layers.
- Place the elastic ends at the side edges of both fabric pieces.
- Align the elastic band parallel to the mask's curved edge.
- Pin the elastic in place at both ends to prevent shifting.
- Double-check that the elastic isn't twisted between the fabric pieces.
- Verify the elastic's length matches your measurements from edge to edge.
Maintain equal distance between the elastic and fabric edges while you work to guarantee proper fit and comfort.
Step 6: Sew around the edges of the eye mask, leaving a 4 cm opening unsewn for turning.

With the elastic properly positioned and pinned, begin sewing around the perimeter of your eye mask using a 1/4-inch seam allowance.
Start at one side and sew continuously, making certain to backstitch at the beginning and end points. When you reach each elastic band, verify it's still correctly placed between the fabric layers.
Leave a small 4 cm opening along one of the straight edges - this will be your turning gap.
Make certain your stitching line is straight and even throughout. Double-check that you've caught both fabric layers in your seam, as this will guarantee a clean turn later.
Step 7: Turn the eye mask through the opening and stitch the opening.
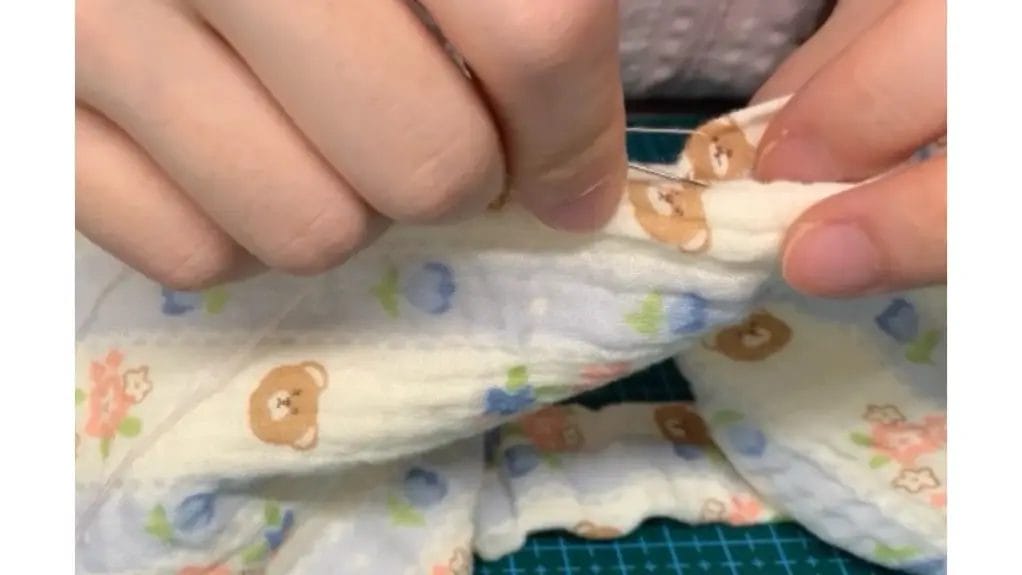
Push your fabric through the 4 cm opening to turn the eye mask right side out.
Use a pencil or turning tool to gently push out the corners for crisp edges.
Once turned, press the mask flat with an iron, ensuring the seams are straight and aligned.
- Insert pins along the opening to hold raw edges together.
- Fold raw edges inward by 1 cm to match the seam allowance.
- Press the folded opening with an iron to create a clean edge.
- Stitch the opening closed using a slip stitch or blind stitch.
- Topstitch around the entire mask 3mm from the edge for a professional finish.
Tips for Personalization
When selecting fabric for your eye mask, you'll want to ponder both aesthetics and functionality by choosing patterns and colors that reflect your style while ensuring the fabric remains opaque enough to block light.
You can enhance your mask's visual appeal by incorporating decorative elements like embroidery, appliqués, or small fabric flowers along the edges.
For a touch of luxury, contemplate adding subtle metallic thread accents or small rhinestones, being careful to place them where they won't contact your skin during use.
Choosing Fabric Patterns and Colors
Selecting the right fabric pattern and color scheme for your eye mask makes a significant difference in both aesthetics and functionality.
You'll find that leftover dress material or quality cotton works well for a nice, comfortable fit. Consider both the exterior and lining fabrics for a fun, personalized touch.
- Choose dark, solid colors for better light blocking properties.
- Select patterns that complement your bedroom decor or travel accessories.
- Consider seasonal fabrics like silk for summer or flannel for winter.
- Opt for contrasting patterns between the front and back layers.
- Match thread colors to your fabric for a professional finish.
Adding Embellishments or Decorations
Now that you've chosen your base fabrics, personalization through embellishments can transform your eye mask into a unique accessory.
Consider adding delicate lace trim along the edges or decorative ribbons for an elegant touch. For a special gift, lay small beads or sequins on the outside in a pattern before stitching them securely.
Embroider initials or simple designs using complementary thread colors. You can also attach decorations like fabric flowers, small appliques, or satin bows at the corners.
Remember to keep embellishments flat and secure to maintain comfort during sleep.
Frequently Asked Questions
How Long Does a Handmade Eye Mask Typically Last With Regular Use?
Your handmade eye mask will last 6-12 months with daily use, but you'll extend its lifespan to 1-2 years by washing it gently and storing it properly between uses.
Can I Wash My DIY Eye Mask in the Washing Machine?
You can machine wash your eye mask on a gentle cycle in a mesh laundry bag. Use cold water, mild detergent, and air dry to prevent damage to elastic and fabric.
What's the Best Fabric Choice for Sensitive Skin?
You'll want 100% natural cotton, silk, or bamboo fabric for your eye mask. These hypoallergenic materials won't irritate sensitive skin, and they're breathable. Avoid synthetic blends or polyester.
Will the Elastic Band Lose Its Stretch Over Time?
You'll notice elastic bands gradually lose elasticity through repeated stretching and washing. To extend lifespan, choose quality braided elastic over knitted, and alternate between two masks to allow recovery time.
Can I Make These Eye Masks in Bulk for Party Favors?
You'll need to streamline your production process by cutting multiple fabric layers simultaneously, setting up assembly-line stations, and batch-sewing elastic bands. Plan 15-20 minutes per mask when working efficiently.
Conclusion
You'll find this DIY eye mask project combines practicality with personal style. By following the precise measurements and construction techniques outlined, you've created a professional-quality sleep accessory that's uniquely yours. Remember to test the elastic tension before final stitching and consider reinforcing high-stress points with double stitching. For future masks, you can adjust the pattern dimensions to achieve your ideal fit and light-blocking coverage.
0 comments