

Looking for a practical yet stylish way to organize your everyday essentials? A fabric storage tray is a perfect solution. It’s versatile, lightweight, and easy to customize with your favorite fabrics. Whether on your desk, dresser, or entryway table, this DIY fabric tray keeps small items like keys, jewelry, or office supplies neatly contained and easily accessible. I’ll walk you through a simple step-by-step tutorial to create your own fabric storage tray using just a few materials. The process is beginner-friendly and requires only basic sewing skills.
Key Takeaways
- Fabric storage trays are easy to make and highly customizable.
- Cutting small triangles from batting corners allows you to fold and shape basket-like edges.
- Attaching snaps at corners creates sturdy walls for your tray.
- Using quality fabrics and neat sewing will enhance both appearance and durability.
- Perfect for organizing small daily essentials in any room of your home.
Materials Needed
- 1 piece of batting (17 cm x 17 cm)
- 1 piece of outer fabric (19 cm x 19 cm)
- 1 piece of lining fabric (19 cm x 19 cm)
How to Sew a Fabric Storage Tray
Before you start, take a moment to gather all your materials. Carefully follow each step to ensure neat seams and accurate measurements, which are key to creating a professional-looking fabric storage tray.
Step 1: Prepare the Batting
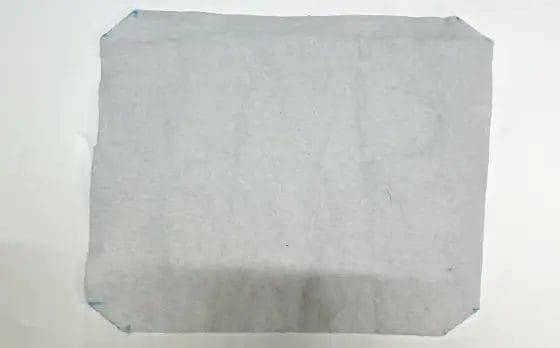
Begin by taking your 17 cm by 17 cm batting piece. At each of the four corners, cut out a small triangle measuring 1.5 cm by 1.5 cm. These cuts will help form the tray’s sides when folded.
Step 2: Attach the Batting to the Outer Fabric
Place the batting on the wrong (back) side of the outer fabric (19 cm x 19 cm). Use an iron to fuse the batting onto the fabric securely. Make sure to smooth out any wrinkles or bubbles during this process for a clean finish.
Step 3: Sew Outer Fabric and Lining Together
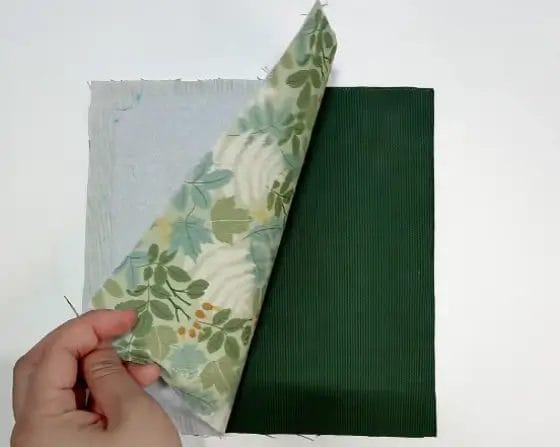
Place the lining fabric and the outer fabric right sides facing each other, aligning all edges. Sew around the perimeter, leaving an opening for turning your tray right side out later. When sewing, be careful to sew along the edges of the batting where you cut the small triangles. Trim any excess fabric outside the seam allowance to reduce bulk.
Step 4: Turn Right Side Out and Press
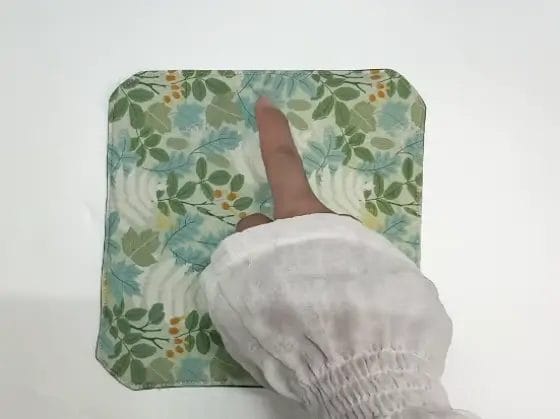
Through the opening you left, turn the sewn piece right side out so that both fabrics are now visible with the batting hidden inside. Press the edges flat with an iron and sew a topstitch along the entire edge. This stitching line will give your tray a crisp, finished look.
Step 5: Create Corners with Snaps
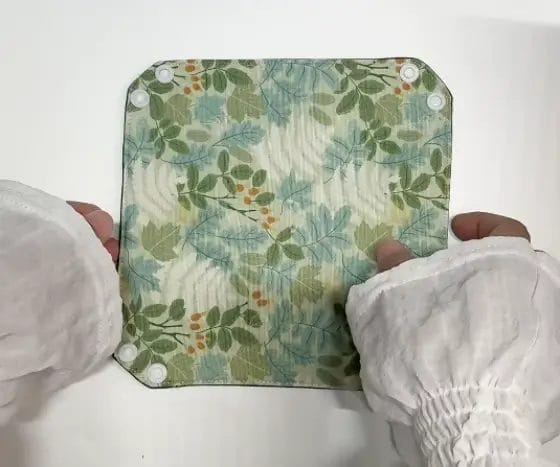
At each corner of your tray, punch two small holes for installing snaps. Attach snap buttons on each corner and fasten them securely. When snapped shut, these corners create the raised edges of your fabric tray, giving it structure and form.
Tips for Success
- Use medium-weight cotton or canvas fabrics for durability and easy ironing.
- Batting with adhesive backing simplifies attaching it to fabric but is not mandatory.
- If you don’t have snap pliers, you can sew buttons or use velcro strips for corner fastenings instead.
- Experiment with larger sizes if you want trays for bigger items like remote controls or sunglasses.
Final Thoughts
Your fabric storage tray is now complete! This simple project combines function with style, and you can customize it endlessly by choosing different fabrics or adding embellishments such as embroidery or patches. Fabric trays are great for organizing jewelry, office supplies, sewing tools, or even as a decorative catchall in any room.
Because of their soft construction, fabric trays are safe to use on delicate surfaces without scratching. Plus, they’re lightweight and easy to move around as needed.
Frequently Asked Questions (FAQ)
What type of batting should I use for the fabric storage tray?
Use a medium-weight, fusible batting for best results. Fusible batting makes it easier to attach to the outer fabric with an iron, providing structure and softness to the tray.
Can I use other fasteners instead of snaps?
Yes, if you don’t have snap fasteners or a snap installation tool, you can use buttons, velcro strips, or even sew the corners together for a fixed basket shape.
How do I clean the fabric storage tray?
Spot clean with a damp cloth for minor stains. For deeper cleaning, gently hand wash and air dry flat to maintain the tray’s shape. Avoid machine washing if using snaps or delicate fabrics.
Can I make the tray in different sizes?
Absolutely! Adjust the size of your fabric and batting pieces according to your needs. Just remember to cut the corner triangles proportionally to maintain the tray shape.
Is sewing experience necessary to complete this project?
Basic sewing skills are sufficient. The project involves straight sewing lines and simple assembly. Beginners may find it helpful to practice on scrap fabric first.
What fabrics work best for this project?
Cotton, canvas, or linen fabrics work well because they are sturdy yet easy to sew and iron. Avoid very thin or stretchy fabrics as they may not hold the tray shape properly.
How do I prevent the edges from fraying?
Use pinking shears to trim edges or finish seams with a zigzag stitch or serger. This will help reduce fraying and extend the life of your tray.
Can I add decorations to my fabric tray?
Definitely! You can personalize your tray by adding embroidery, appliqué, patches, or fabric paint before assembling the pieces.
0 comments