

If you've got a growing pile of fabric scraps and a love for books, you're about to discover three stunning ways to transform those leftover materials into beautiful bookmarks. From elegant pastoral designs with flowing ribbons to bohemian-inspired braided creations and sleek geometric patterns, these projects will help you create unique page markers that reflect your personal style. Let's turn those forgotten fabric pieces into functional works of art.
Key Takeaways
- Create pastoral floral bookmarks by cutting fabric into 2x6 inch rectangles, folding edges inward, and adding decorative ribbon.
- Make bohemian braided bookmarks using three fabric strips braided together and finished with beads or tassels.
- Design minimalist geometric bookmarks by attaching fabric squares to elastic cord and finishing with metal buckles.
- Press seams flat with an iron and use sharp scissors for clean cuts to ensure professional-looking results.
- Personalize bookmarks with contrasting patterns, decorative buttons, small charms, or tassels for unique finishing touches.
How to Make Pastoral Floral Bookmarks
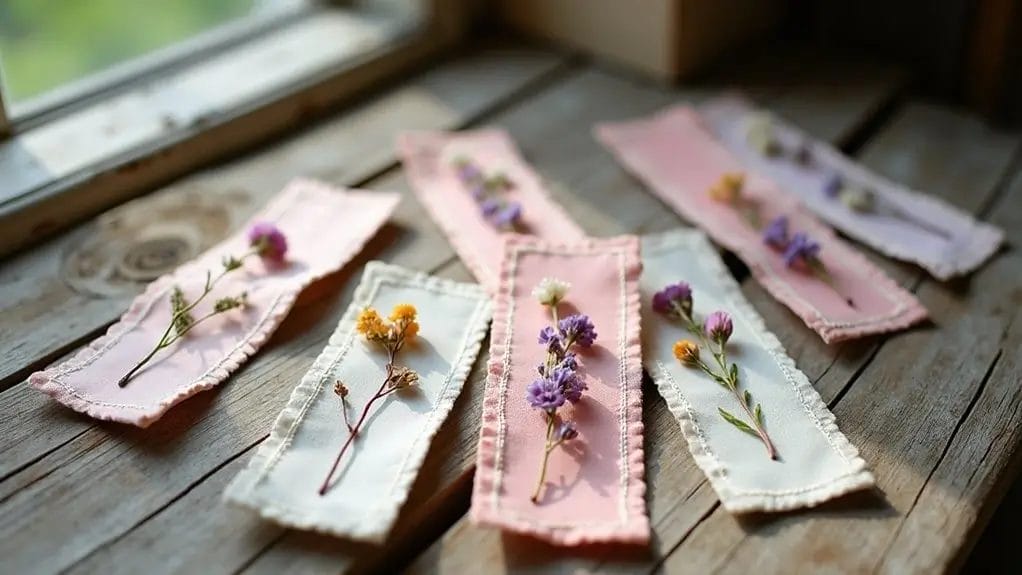
You'll want to start by collecting your favorite floral-patterned fabric, scissors, thread, and a decorative ribbon for this charming pastoral bookmark.
Next, you'll cut your chosen fabric into a neat 2x6 inch rectangle and carefully fold the edges inward before sewing them together to create clean seams.
Finally, you'll add a personal touch by attaching a coordinating ribbon to the top of your bookmark, creating the perfect finishing accent for your handmade creation.
Step 1: Gather Materials
Before diving into this charming DIY project, let's round up all the essential materials needed to create beautiful pastoral floral bookmarks. You'll need cotton fabric with floral prints, lightweight iron-on interfacing to add structure, sharp scissors, and a ruler. Don't forget your iron and ironing board for pressing seams. Gather coordinating thread colors, straight pins, and a sewing machine. For embellishments, collect ribbon lengths, decorative buttons, and scrap fabric in complementary patterns. Keep a pencil handy for marking measurements and a cutting mat to protect your work surface.
Step 2: Cut a Rectangular Strip of Fabric
Begin by measuring and cutting a rectangular fabric strip that's 3 inches wide by 8.5 inches long.
Using a ruler and fabric scissors, mark your measurements directly on the fabric scrap with a fabric pen. Make sure your lines are straight and square for clean edges.
Position your ruler along the marked lines and cut carefully, maintaining steady pressure on the fabric.
If you're using patterned material, pay attention to the design's orientation - you'll want it facing the right way on your finished bookmark.
Don't worry if your fabric scrap is slightly larger; you can always trim it to the exact inch measurements later.
Step 3: Sew the Ends of the Fabric Together
With your fabric strip perfectly cut to size, it's time to fold and sew the edges together to create a polished, durable bookmark.
First, fold your fabric in half lengthwise, right sides facing inward. Pin the long edges together to prevent shifting while you sew.
Using a straight stitch on your sewing machine, create a 1/4-inch seam along the length. Turn the fabric right-side out using a safety pin or turning tool.
Press the seams flat with an iron, ensuring crisp edges. Finally, fold in the raw edges at one end and stitch across to close.
Step 4: Sew a Ribbon to One End of the Fabric
Select a coordinating ribbon that complements your fabric's pattern and cut it to approximately 8 inches in length.
You'll want to attach this ribbon to create a decorative bookmark tail that adds both style and functionality to your project.
- Fold the ribbon in half and position it at one end of your fabric strip
- Pin the ribbon securely in place, making sure it's centered
- Thread your machine with matching thread color
- Sew the ribbon to the fabric using a straight stitch, reinforcing with a back-and-forth motion
- Double-check that the ribbon is firmly attached by gently tugging it
How to Make Bohemian Braided Bookmarks
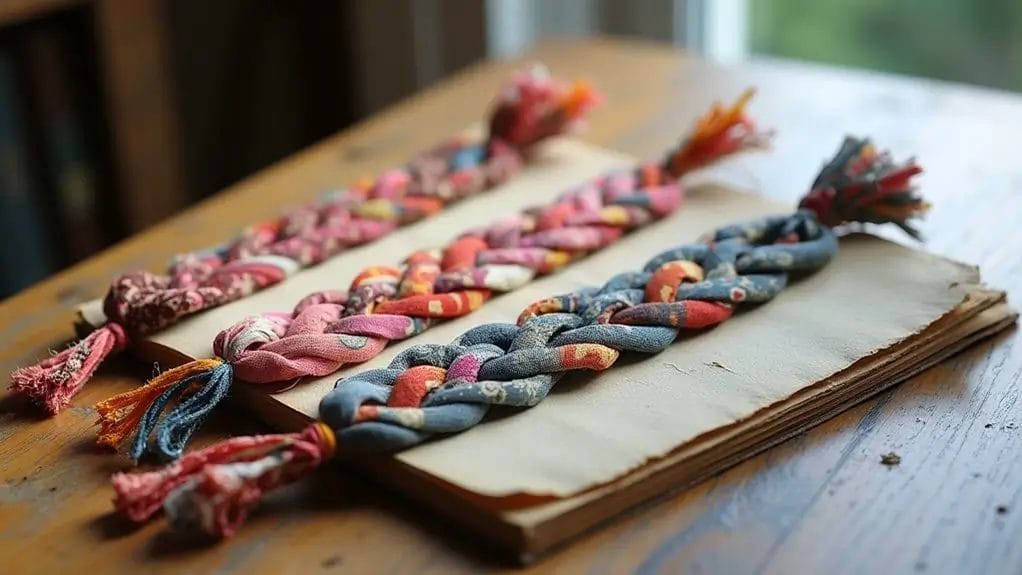
You'll love creating these fun bohemian bookmarks using old fabric scraps you've got lying around at home.
Start by gathering your materials and cutting your chosen fabric into long, even strips that you'll then weave together using a simple braiding technique with decorative thread.
Once you've finished braiding, add a personalized touch by tying a small bow or attaching a colorful tassel at the end of your bookmark.
Step 1: Gather Materials
Before diving into this creative project, gather your essential materials: three strips of colorful fabric (each 1.5 inches wide and 12 inches long), sharp fabric scissors, a hot glue gun with glue sticks, decorative beads or charms, and a ruler for precise measurements.
- Select scrap fabric pieces with complementary patterns that'll create a striking combination
- Cut your fabric strips with precision, guaranteeing straight edges for a clean DIY look
- Test your hot glue gun to verify it's working properly
- Choose beads or charms that match your fabric's color scheme
- Set up your workspace with all materials within arm's reach for efficient crafting
Step 2: Cut the Old Fabric into Strips
Carefully measure and cut your fabric into three equal strips, making sure each piece measures 1.5 inches wide by 12 inches long. Use a rotary cutter and ruler for the cleanest edges, but sharp scissors will work too.
Keep your cuts straight and precise for professional-looking results.
If you're working with patterned fabric, align the design consistently across all three strips. You'll want the pattern to flow smoothly when you braid them together.
Double-check your measurements before making each cut - having equal-sized strips is essential for creating a balanced, beautiful bookmark that lies flat when finished.
Step 3: Use Braiding Thread to Braid the Strips
Take your three fabric strips and lay them parallel to each other on a flat surface, leaving about an inch of space between each one. This fun craft will transform your thin strips into a beautiful braided bookmark.
Start by securing the ends with embroidery thread, tying them tightly together.
- Hold the left strip and cross it over the middle strip.
- Move the right strip to the center position.
- Continue alternating sides for the braiding pattern.
- Keep your tension consistent for a uniform look.
- When you reach the end, secure with embroidery thread again.
The braiding process creates an intricate weave that's both decorative and durable.
Step 4: Tie a Small Bow or Tassel at the End of the Bookmark
Once you've completed the braid, it's time to add a decorative finishing touch that'll make your bookmark truly special.
For a fun tassel, gather tiny strips of matching fabric and tie them together at one end. Secure them tightly with thread, then trim the little bits to create an even, cute fringe.
If you prefer a bow, cut a small fabric strip about 4 inches long.
Fold it into a loop, pinch the center, and wrap a thin piece of thread around the middle. Fluff out the loops and secure the bow to your bookmark's end with a few tight stitches.
How to Make Minimalist Geometric Bookmarks
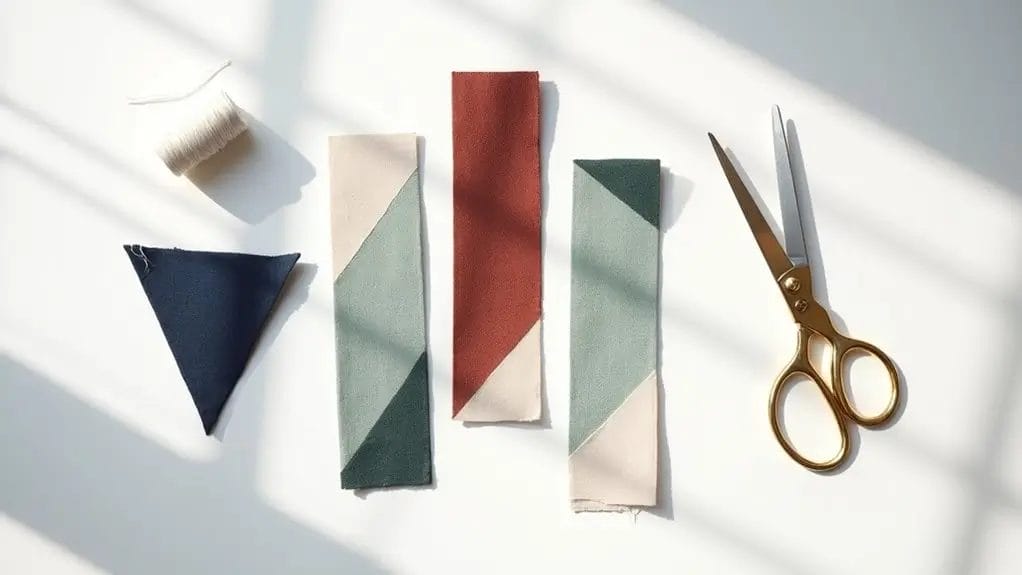
You'll love creating these sleek geometric bookmarks using just a few simple materials like fabric squares, elastic cord, and metal buckles.
Following the straightforward steps of cutting uniform fabric pieces and securing them with hot glue to the elastic creates a modern, clean-lined design.
The final touch of attaching metal buckles to each end gives your bookmark a polished, professional look while keeping your place in style.
Step 1: Gather Materials
Before starting this stylish DIY project, gather these essential materials: cotton or linen fabric in your preferred colors, sharp fabric scissors, a ruler, pencil, iron, and fusible interfacing.
- Choose a medium-weight fabric that's sturdy enough for your handmade bookmark but still flexible
- Select contrasting colors or patterns to create eye-catching geometric designs
- Make sure your iron is clean and set to the appropriate heat setting for your fabric
- Get quality fabric scissors - they'll give you crisp, precise edges
- Consider adding optional materials like decorative thread or fabric paint for extra flair
You'll need a flat, clean workspace to lay out your project materials efficiently.
Step 2: Cut Several Square Pieces of Fabric
After gathering your materials, start by cutting three 6-inch squares from your chosen fabric. Make certain your scissors are sharp for clean, precise edges.
If you're using patterned fabric, align the design so it's centered within each square. You'll want perfect squares, so double-check your measurements before you cut.
For extra precision, use a ruler and fabric marker to draw your cutting lines.
If you're making multiple bookmarks, cut all your squares at once to guarantee consistency. Stack your fabric neatly and secure with pins to prevent shifting while you cut through the layers.
Step 3: Use Hot Glue to Attach the Pieces to the Elastic Cord
With your fabric squares ready, it's time to bring out the hot glue gun and elastic cord to create your minimalist bookmarks.
Follow these quick step-by-step instructions to layer your pieces perfectly:
- Apply a thin line of hot glue along one edge of your fabric square
- Press the elastic cord firmly into the glue, holding for 10 seconds
- Fold the fabric over the cord and secure with another line of glue
- Space your fabric squares evenly along the elastic, about 2 inches apart
- Create a clean finish by tucking the cord ends under the last pieces and securing with glue
Step 4: Attach Metal Buckles to Each End of the Bookmark
Secure your minimalist bookmark with sleek metal buckles that add both style and functionality to the finished piece.
Thread each end of the elastic cord through a small metal buckle, folding it back 1/2 inch. Pin the folded section in place, then use matching thread to stitch it securely.
This tutorial's finishing touch transforms your handmade bookmark into a gift-worthy accessory that's both practical and stylish. Double-check that your stitches are tight and even - you'll want these buckles to stay firmly attached.
The metal hardware creates a professional look while keeping your bookmark's edges neat and tidy.
Frequently Asked Questions
Can Fabric Bookmarks Damage or Stain the Pages of My Books?
You'll want to use tightly woven, clean fabric that's colorfast and prewashed. As long as you're not using fabric with dyes that bleed, your bookmarks won't damage or stain your precious books.
How Long Do Fabric Bookmarks Typically Last With Regular Use?
You'll get several years of use from your fabric bookmarks if they're well-made with sturdy materials and proper stitching. With regular handling, they'll maintain their shape and durability through countless reading sessions.
What Types of Fabric Work Best for Making Washable Bookmarks?
You'll get the best washable bookmarks using tightly woven cotton, denim, linen, or quilting fabric. They're durable, won't fray easily, and can handle repeated washing without losing their shape or color.
Should I Pre-Wash Fabric Scraps Before Making Bookmarks?
You'll definitely want to pre-wash your fabric scraps! This prevents future shrinkage and removes any sizing chemicals. Plus, you'll avoid unwanted surprises when your bookmark might accidentally get wet later.
What Are the Best Ways to Prevent Fabric Bookmarks From Fraying?
You'll prevent fraying by using pinking shears, adding fusible interfacing, or zigzag stitching the edges. For extra durability, try applying Fray Check or double-folding your fabric edges before sewing.
Conclusion
You've now got three fantastic ways to transform your fabric scraps into beautiful bookmarks! Whether you're drawn to the pastoral floral design with its elegant ribbons, the bohemian braided style with eye-catching beads, or the modern geometric look with sleek metal buckles, you'll never lose your place in style. Don't let those fabric scraps go to waste - start crafting your personalized bookmarks today!
0 comments