

If you like the neat look and structured style of box pleats in clothes or home décor, you’ll be happy to know you can sew them yourself.
While these classic folds might seem intimidating at first, breaking down the process into manageable steps will help you master this essential technique.
Whether you're creating a tailored skirt or adding sophisticated detail to window treatments, understanding how to sew a box pleat will transform your sewing projects.
Key Takeaways
- Mark pleat lines accurately on fabric using chalk or fabric markers. Measure equal distances for consistent spacing between pleats.
- Fold the fabric at the marked lines, bringing the outer edges toward the center. Then, pin securely to maintain the pleat structure.
- Press each fold firmly with a hot iron to create crisp creases before moving to the next pleat.
- Stitch along the designated seam line, maintaining even tension and spacing between the pleats.
- A steam press completes pleats and measures each for uniform width, adjusting any variations before final construction.
What You'll Need: Tools and Materials
To sew perfect box pleats, you'll need a few essential tools and materials:
- Medium to heavyweight fabric of your choice that holds shape well.
- Matching sewing thread in a slightly lighter shade for better visibility.
- Basic sewing tools include scissors, pins, and a fabric marker.
- Pattern paper and a ruler for drafting your pleat template.
- Sewing machine with standard presser foot for securing seam allowances.
Remember to pre-wash your piece of fabric before starting to prevent unwanted shrinkage after pleating.
Understanding Box Pleat Measurements and Calculations
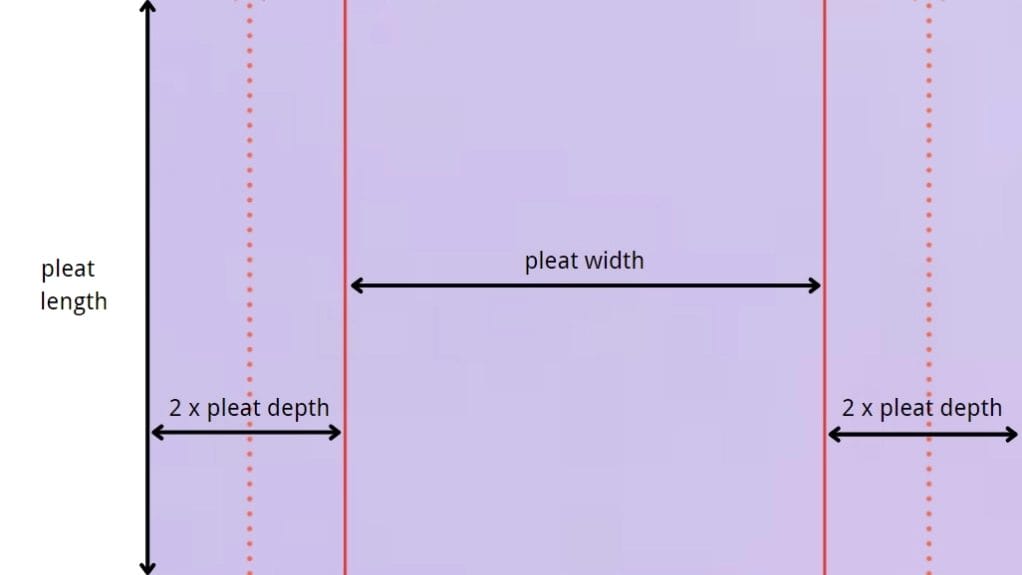
Three essential measurements form the foundation of successful box pleats: the finished pleat width, the fabric allowance, and the spacing between pleats.
When box pleats are made, you'll need to calculate fabric requirements carefully. For each finished pleat, multiply your desired pleat width by six to determine the amount of fabric needed.
For example, if you want a 2-inch pleat size, you'll need 12 inches of fabric. Consider the number of pleats you want and multiply accordingly.
Remember to add extra fabric for seam allowances and hem allowances when creating your pattern piece.
How to Sew a Box Pleat: Step-by-Step Tutorial
Making a box pleat may seem complex. But breaking it down into simple steps makes the process manageable and enjoyable.
Step 1: Measure and Mark Pleats
Begin by deciding the width of each box pleat you want to create. On the wrong side of your fabric, mark evenly spaced lines to indicate where each pleat will fold.
For a box pleat, you need to mark three lines per pleat: one center fold line and two outer fold lines. The distance between the two outer lines should be twice the width of your finished pleat. Make sure these lines are straight and evenly spaced across the fabric.
Step 2: Fold the Pleats
Next, fold the fabric so that the two outer marked lines meet together on the back side of the fabric. This folding creates a box shape on the front side. Secure the folds in place using pins or clips, ensuring the pleats are crisp and evenly aligned.
Step 3: Press the Pleats
Using an iron set to the appropriate temperature for your fabric, press the folds flat. Pressing helps hold the pleats in place and shapes them crisply, making sewing easier and more accurate.
Step 4: Baste the Pleats (Optional)
If you want extra security before final stitching, temporarily sew along the top edge of the pleats with a long, loose stitch.
Basting keeps the pleats from shifting and allows you to check their positioning before permanent sewing.
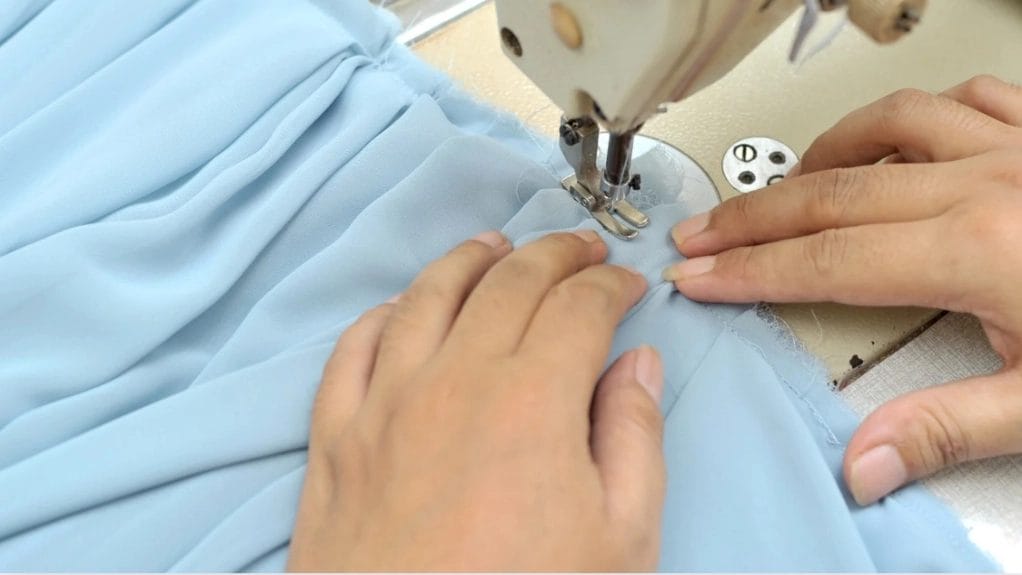
Step 5: Sew the Pleats
Set your sewing machine to a medium stitch length. Then, sew along the top edge of the pleats where they are pinned, about ½ inch (1.3 cm) from the edge. This stitching secures the pleats firmly in place.
Depending on your project, you may also sew further down from the top edge to secure a deeper pleat. This is especially useful for skirts or garments that need added structure.
Step 6: Finish Your Project
Once your box pleats are sewn and secured, proceed with assembling your garment or item as planned. Give your pleats a final press to ensure they are sharp and neat before moving on.
Common Box Pleat Troubleshooting Tips
Creating box pleats may seem straightforward. But even experienced sewists can encounter common issues that affect the final appearance of their projects.
When you make box pleats, guarantee equal folds of fabric on both sides to prevent uneven spacing. Check that your fabric is folded precisely along marked lines. Verify that the size of your pleat matches the size of your sewing pattern.
To keep your pleats together, secure them with pins perpendicular to the direction the pleat runs. If pleats appear skewed, double-check your markings and realign the folds before stitching.
Press carefully to maintain crisp edges throughout.
Creative Applications for Box Pleats in Projects
Box pleats jazz up countless sewing projects beyond traditional garments.
This type of pleat adds sophistication to home decor items like curtains, tablecloths, and decorative pillows.
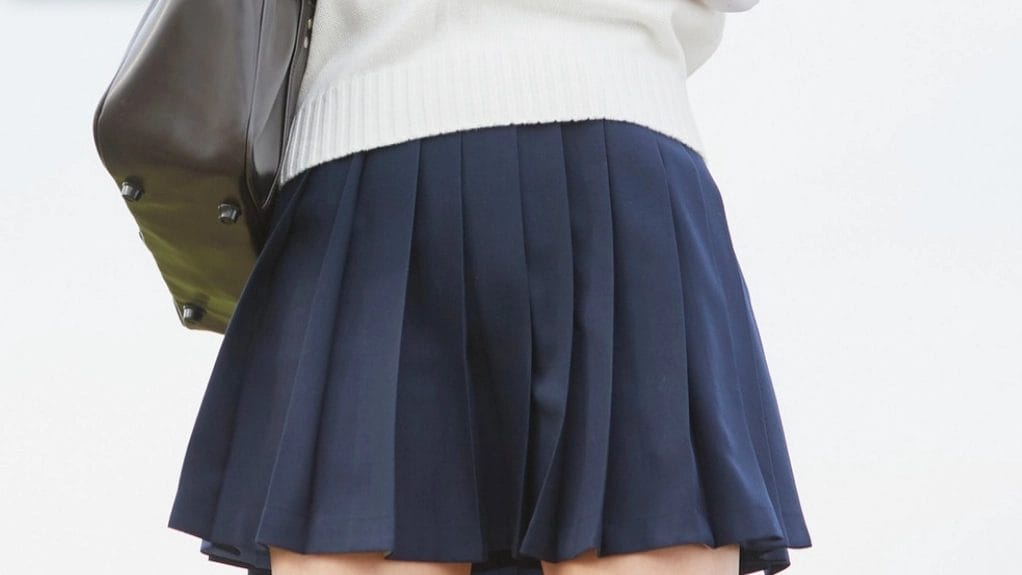
Create a box pleat skirt with many pleats for a classic schoolgirl look, or use an inverted box pleat on a throw pillow cover for modern flair.
Make pleats work for you in unexpected ways by incorporating them into handbags, lampshades, or even chair covers.
Position fabric on top of cushions with box pleats at the corners for a tailored finish. The use of box pleats transforms simple sewing projects into professional-looking creations.
Conclusion
Now you're ready to create beautiful box pleats in your sewing projects. Don't forget to double-check your measurements, press thoroughly, and maintain even tension while stitching.
Whether you're making a skirt, curtains, or decorative pillows, these classic pleats will add sophistication and structure to your designs.
With practice and attention to detail, you'll master this timeless sewing technique and elevate your craftsmanship.
Learn more sewing tips on the Longan Craft Blog, and dive into the fabric world with Longan Craft!
FAQs
Can Box Pleats Be Added to Existing Garments Without Taking Them Apart?
You can add box pleats to existing garments. But you'll have better results if there's excess fabric to work with. You'll need to carefully measure, mark, and secure the pleats through existing seams.
How Long Do Pressed Box Pleats Typically Maintain Their Shape?
Well-pressed box pleats can hold their shape for several months with proper care. Natural fibers like wool retain their pleats the longest, while synthetic fabrics may require more frequent pressing to maintain their crispness.
Which Fabric Interfacing Works Best for Creating Permanent Box Pleats?
You'll get the best permanent box pleats using heavy-weight fusible interfacing. Choose sew-in horsehair canvas for wool fabrics. Or opt for non-woven fusible interfacing when working with lighter materials like cotton.
Are Box Pleats Suitable for Curved Hemlines and Asymmetrical Designs?
You'll find box pleats challenging on curved hemlines and asymmetrical designs. While possible, they don't drape naturally around curves and may create uneven spacing. Consider knife pleats instead for curved or asymmetrical patterns.
Can Box Pleats Be Successfully Sewn on Stretchy or Knit Fabrics?
You'll find box pleats challenging on stretchy fabrics, as they won't hold their shape well. If you must use knits, choose stable ones and interface them first for better structure and durability.
0 comments