

Learning how to make fabric coasters isn't just a practical DIY project. It's also an excellent way to use up your fabric scraps and add personalized touches to your home décor.
You can create this adorable little house coaster with just a few basic supplies and simple sewing techniques. Whether you're a beginner or experienced crafter, these cute DIY fabric coasters offer an engaging project that you can complete in under an hour.
Key Takeaways
- Cut a 12x12 cm square for the roof and a 20x13 cm rectangle for the house body.
- Fold the square diagonally, stitch two raw edges, leave a 5 cm opening for stuffing.
- Fold the rectangular fabric lengthwise with the right side in, stitch three edges (leaving a 5 cm opening), and add stuffing.
- Align and hand-sew the stuffed roof to the house body, using small stitches for a secure connection.
- Enhance the coaster with decorative topstitching, appliqués, buttons, or embroidery to personalize and add style.
What Materials Will You Need?
A lovely little house fabric coaster project requires several essential materials and tools:
- Scrap fabrics: For the house design;
- Needle and thread or a sewing machine;
- Sharp scissors;
- Filling material (e.g., cotton or batting);
- Ruler: For precise measurements;
- Pins: Optional, to hold fabric in place while sewing;
- Iron: To press fabric for smooth sewing, optional;
- Fabric marker or chalk: For marking cutting lines and designs, optional.
How to Make Fabric Coasters: Sew a Little House Coaster
Gather your supplies, and let’s get started on this creative and practical crafting project! Follow this easy tutorial to complete this fun sewing project successfully.
Step 1: Prepare Your Fabric Pieces
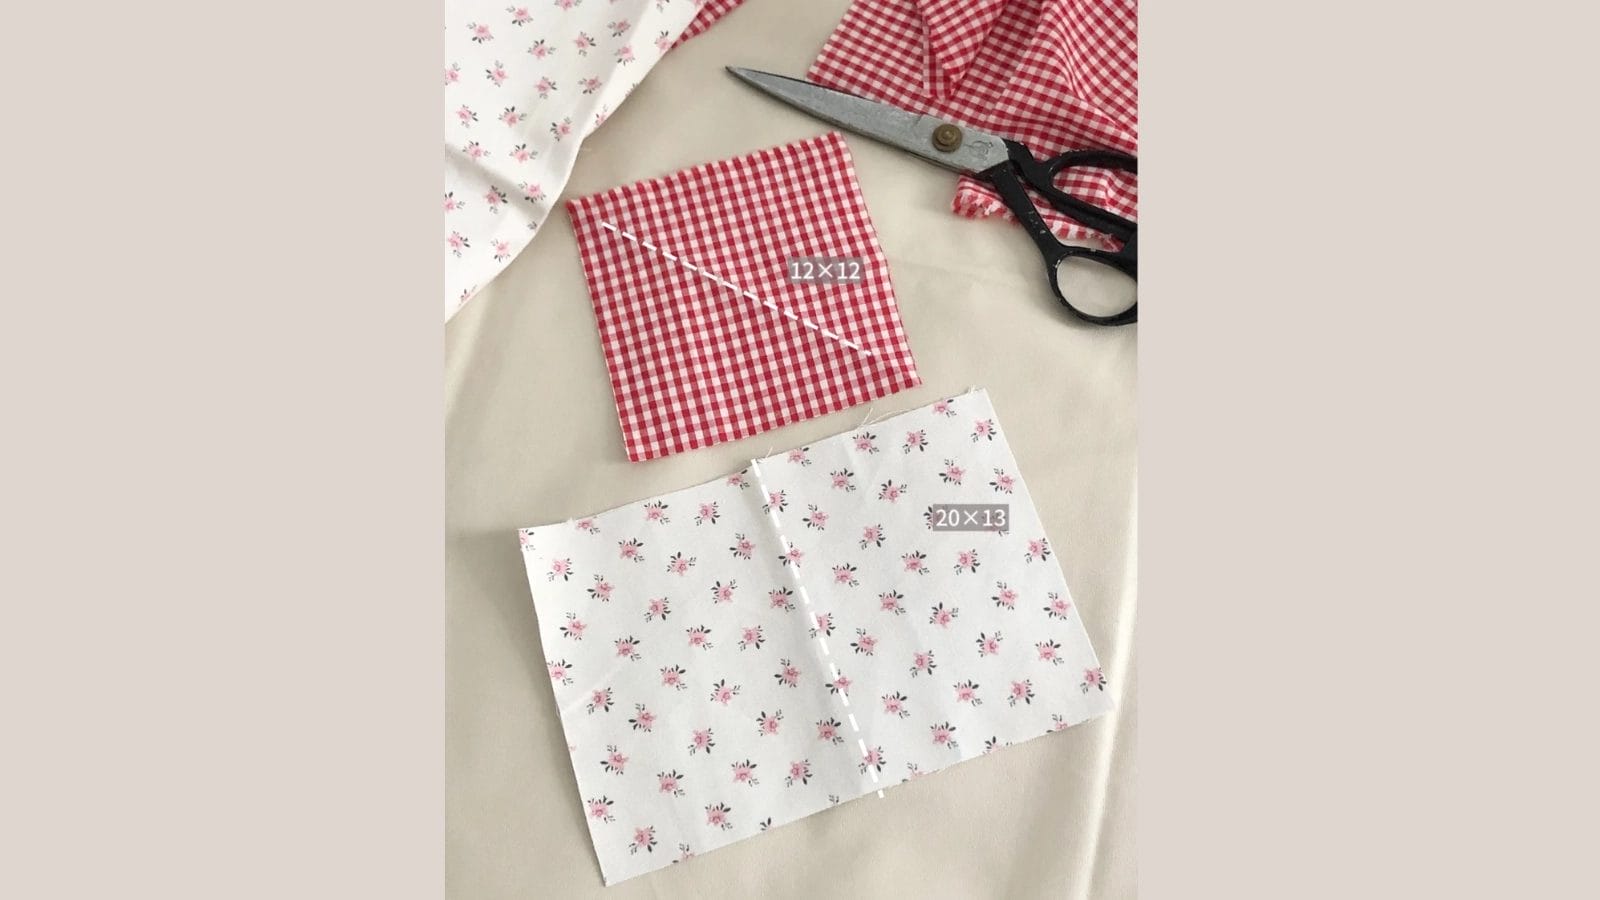
Gather your materials and begin by cutting a 12*12 cm square from your chosen fabric. This square piece will be the roof of the house.
Then, cut a 20*13 cm rectangular fabric as the main body of the house.
Make precise cuts to prevent fraying edges, which can affect your final coaster pattern.
Step 2: Sew and Stuff the Roof
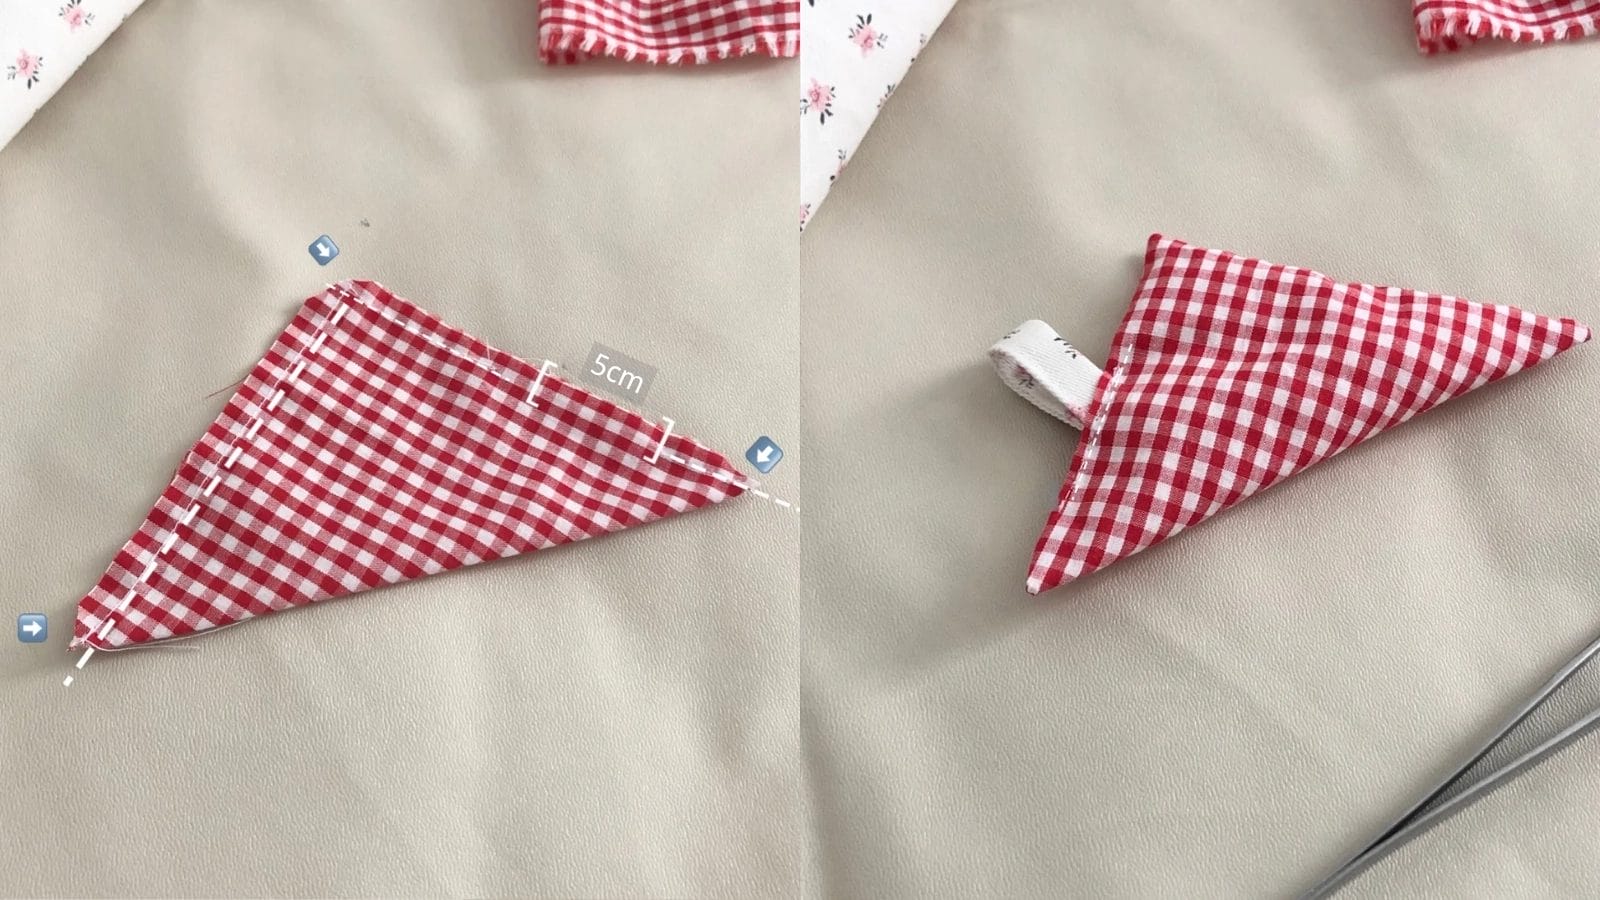
Fold along one of the square's diagonals, with the wrong side facing outward. Then, sew around the two right-angled edges, leaving a 5 cm opening on one side for stuffing.
After sewing, trim a small notch at each corner, then turn the fabric right side out. Use a chopstick or tweezers to smooth out and shape the corners neatly.
Now, you can begin stuffing the roof with cotton.
Before closing the opening, use fabric scraps to craft a small chimney. Shape the scraps into a tube or rectangular form, then securely stitch it onto the roof for added detail.
Step 3: Sew and Stuff the House Body
Once you've finished the cute roof, you can stitch the main body of the house coaster.
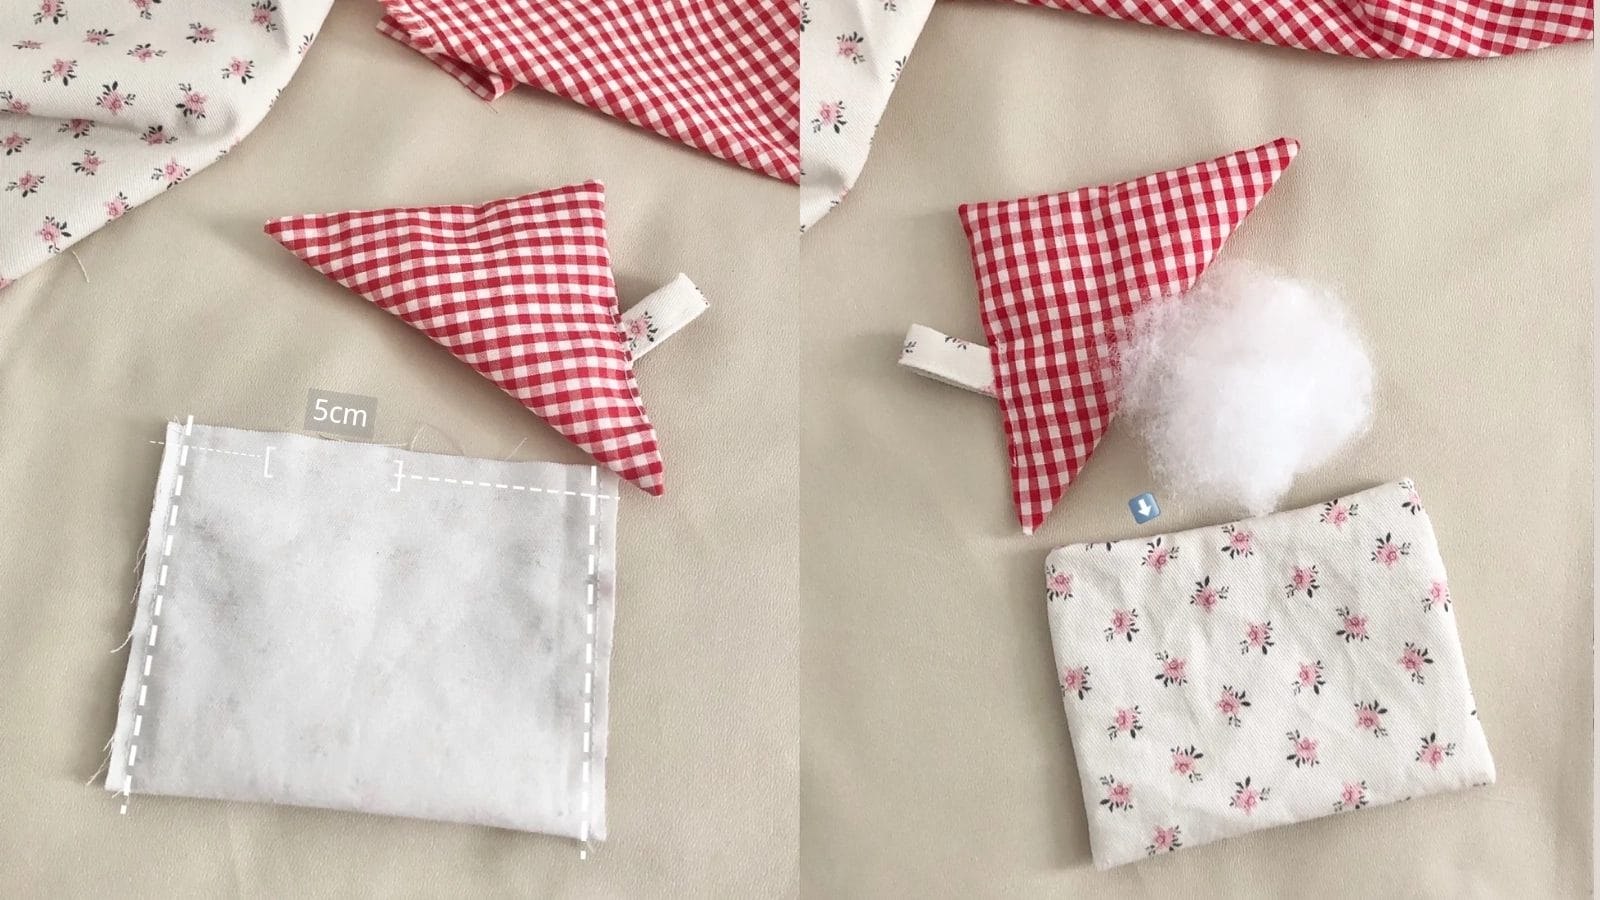
Fold the rectangular fabric in half lengthwise with the right side inward. Stitch three edges and leave a 5 cm opening on the top edge.
Trim small notches at each corner, turn the coaster right side out, and use tweezers or chopsticks to shape the corners neatly.
Insert a small amount of stuffing through the opening and close it using an invisible stitch.
Step 4: Assemble the Roof and House Body Pieces Together
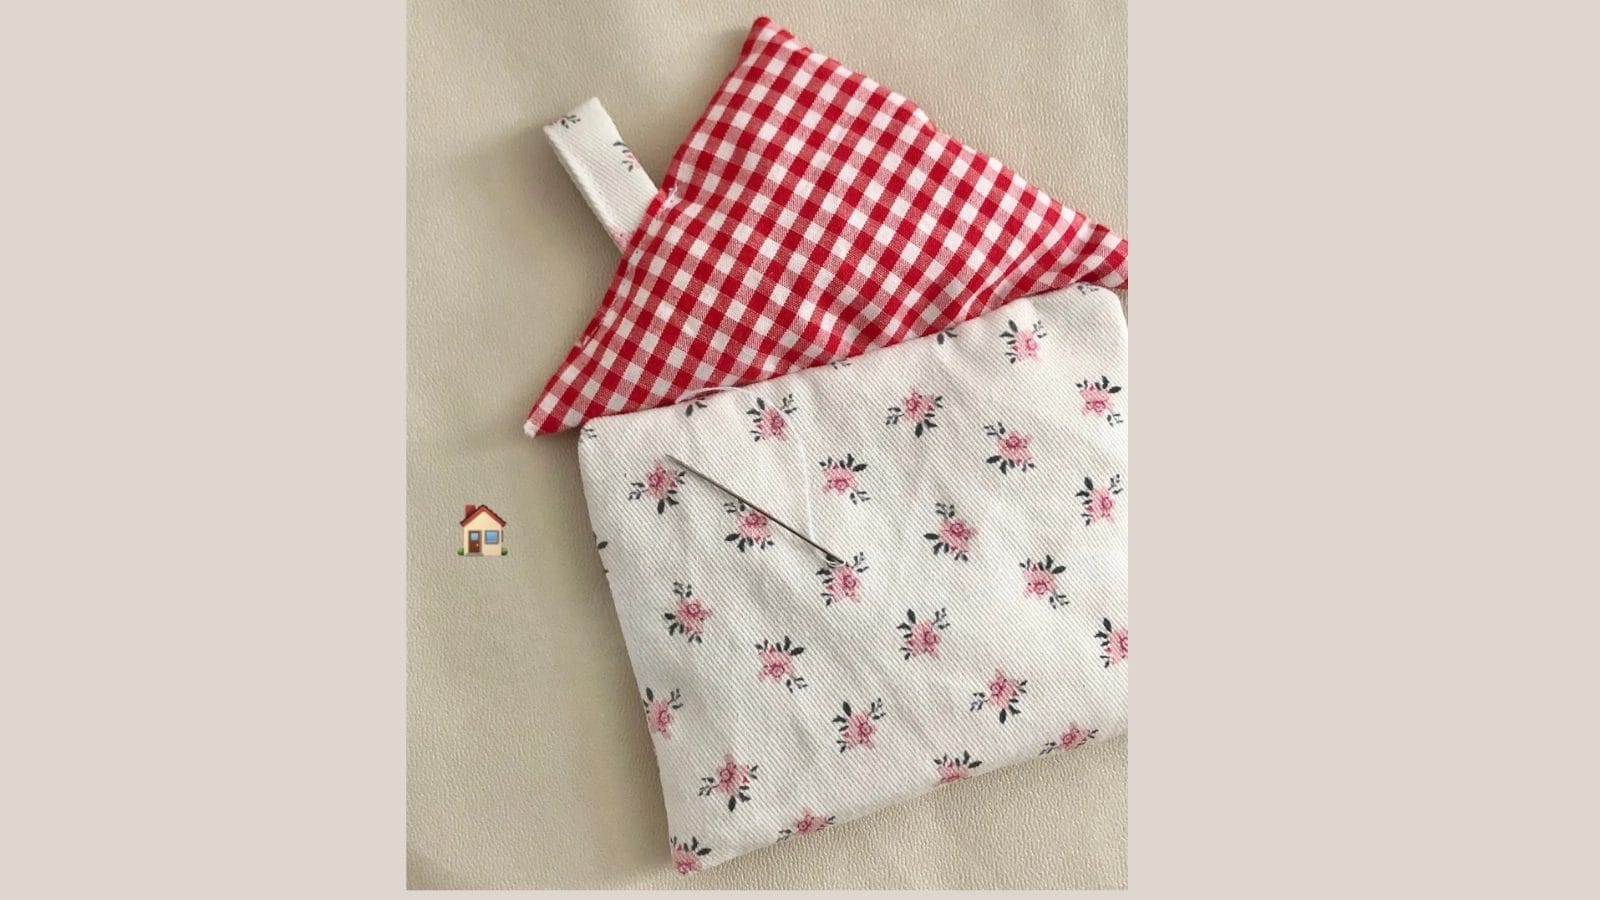
Align the stuffed roof with the top edge of the house body. Carefully hand-sew the roof to the house body, making small, tight stitches along the edges for a secure connection.
You can use matching thread to blend seamlessly or contrasting thread for a decorative touch.
Check that the roof sits snugly on the house body and adjust as needed during sewing. Once attached, inspect the stitching to ensure durability, and your charming little house coaster is complete!
Step 5: Add Details (Optional)
After completing the coaster, you can enhance its appearance with decorative elements.
Consider adding decorative topstitching around the edges. This will create an easy sewing detail that adds both style and durability. You can use contrasting thread colors to make the stitching pop against your cotton fabric.
Alternatively, try incorporating embellishments like appliqués, buttons, or embroidery to personalize each piece.
Remember to secure any additional elements firmly to guarantee they withstand regular use and washing.
Conclusion
You'll find this cute coaster isn't just practical but also makes excellent gifts. Once you've mastered the guide, you can experiment with different fabric combinations and patterns.
Don't forget to press thoroughly between steps and maintain consistent seam allowances. For best results, always use quality scraps of fabric and keep your machine properly tensioned.
Learn more sewing projects on the Longan Craft Blog, and dive into the fabric world with Longan Craft!
FAQs
How Do You Make Simple Fabric Coasters?
You'll need to cut 5x5" fabric squares and batting, stack them right sides together, pin, sew with 1/2" seam allowance, leave a gap, turn right-side out, press flat, and topstitch around edges.
What Fabric Is Good for Coasters?
You'll get the best results using woven cotton, canvas, or upholstery fabric for their durability. Consider adding PUL or insulated batting for moisture resistance. Tightly woven materials will prevent wear and tear.
How Do You Seal Fabric Coasters?
You'll want to apply a fabric sealant spray designed for textiles, let it dry completely, and then reapply for better coverage. Don't forget to seal the edges with topstitching to prevent moisture from seeping in.
How to Make Homemade Coasters Waterproof?
You'll need to either use PUL fabric as backing, apply fabric waterproofing spray, or add rubber-backed curtain material. For best results, incorporate fusible fleece and seal all edges completely during construction.
0 comments