

Creating felt fireworks ornaments is a delightful craft activity that can add a touch of whimsy and color to any space, regardless of the season. These charming decorations capture the spirit of celebration and joy, making them a perfect addition for any time of the year.
This article will explore a simple yet creative way to make felt fireworks ornaments. These ornaments can be hung as a cheerful display for your home decor or as a unique decoration for your bag. Let's dive into the step-by-step tutorial for crafting these vibrant ornaments, which will brighten up any room!
Key Takeaways for DIY Felt Ornaments
- Use felt fabric in various colors to create unique and personalized ornaments.
- Experiment with different fireworks designs using heat-erase pens and eyeshadow for color and shading.
- Sew intricate lines and details with contrasting threads or embroidery floss for added texture and dimension.
- Add beads to enhance the overall look and give your ornaments a touch of sparkle.
- Cut out the ornament shape with sharp scissors and add two extra layers of felt for depth and visual appeal.
Prepare All the Materials
To get started on your DIY felt ornament project, you'll need a few essential materials, including:
- Felt sheets: Prepare at least three different colors.
- Scissors: To cut the felt pieces.
- Hot glue gun and glue sticks: To glue the layers of felt.
- Needle and thread: Prepare thread in various colors for a cheerful fireworks pattern. Make sure these threads are not too thick if your pattern isn't too big.
- Embroidery floss (optional): Instead of threads, you can use embroidery floss.
- Beads: Select beads in different shapes and colors according to your fireworks design.
- Heat erase pen: Use it to draw your fireworks design onto the felt.
- Eyeshadow Palette: If you have an eyeshadow palette with many beautiful colors, you can use it to color the fireworks.
How to Make Felt Fireworks Ornaments in 7 Steps
Now it's time to bring your DIY felt ornaments to life! You'll start by creating your design, then add colors and stitching details.
Follow these step-by-step instructions to turn your vision into a beautiful, one-of-a-kind ornament.
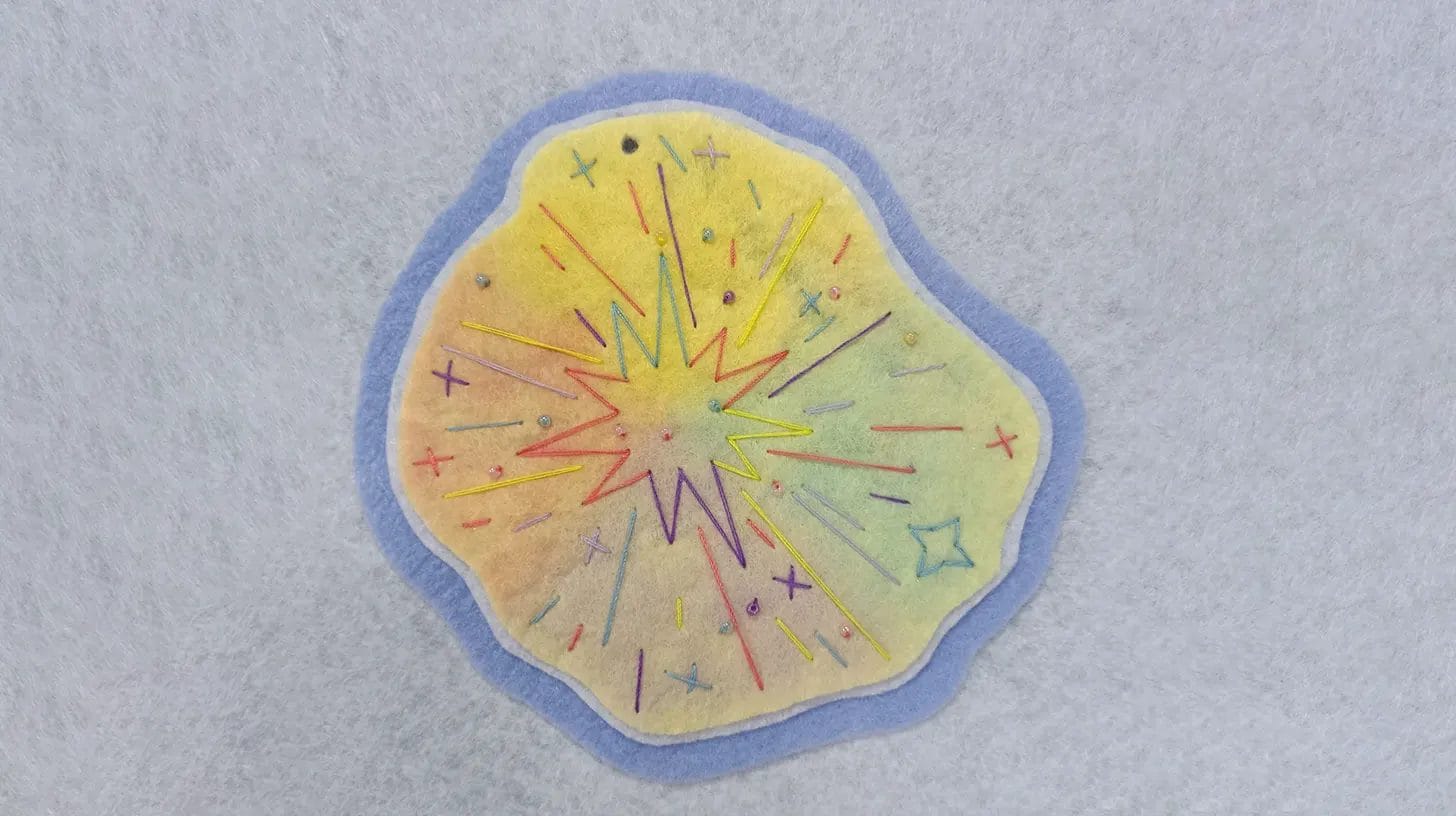
Step 1: Draw your fireworks design
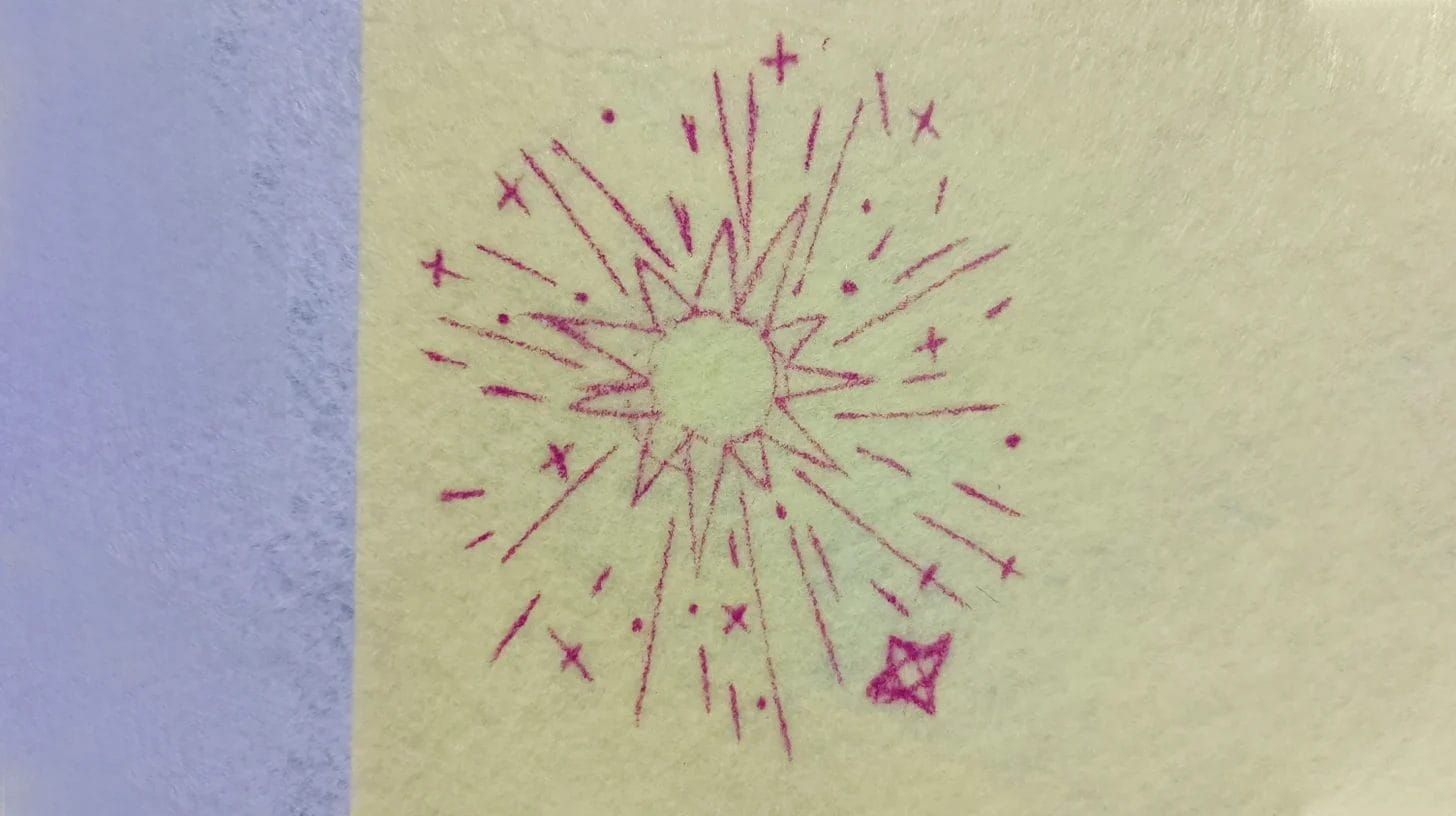
How do you bring your fireworks design to life on felt? You can use a heat-erase pen to draw your design on the felt. This pen is perfect for creating intricate patterns, as the temporary marks it leaves can be easily erased with heat. This feature lets you make precise and clean designs without worrying about mistakes.
You can proceed to the next steps once you're happy with your design.
Step 2: Use eyeshade to color different areas
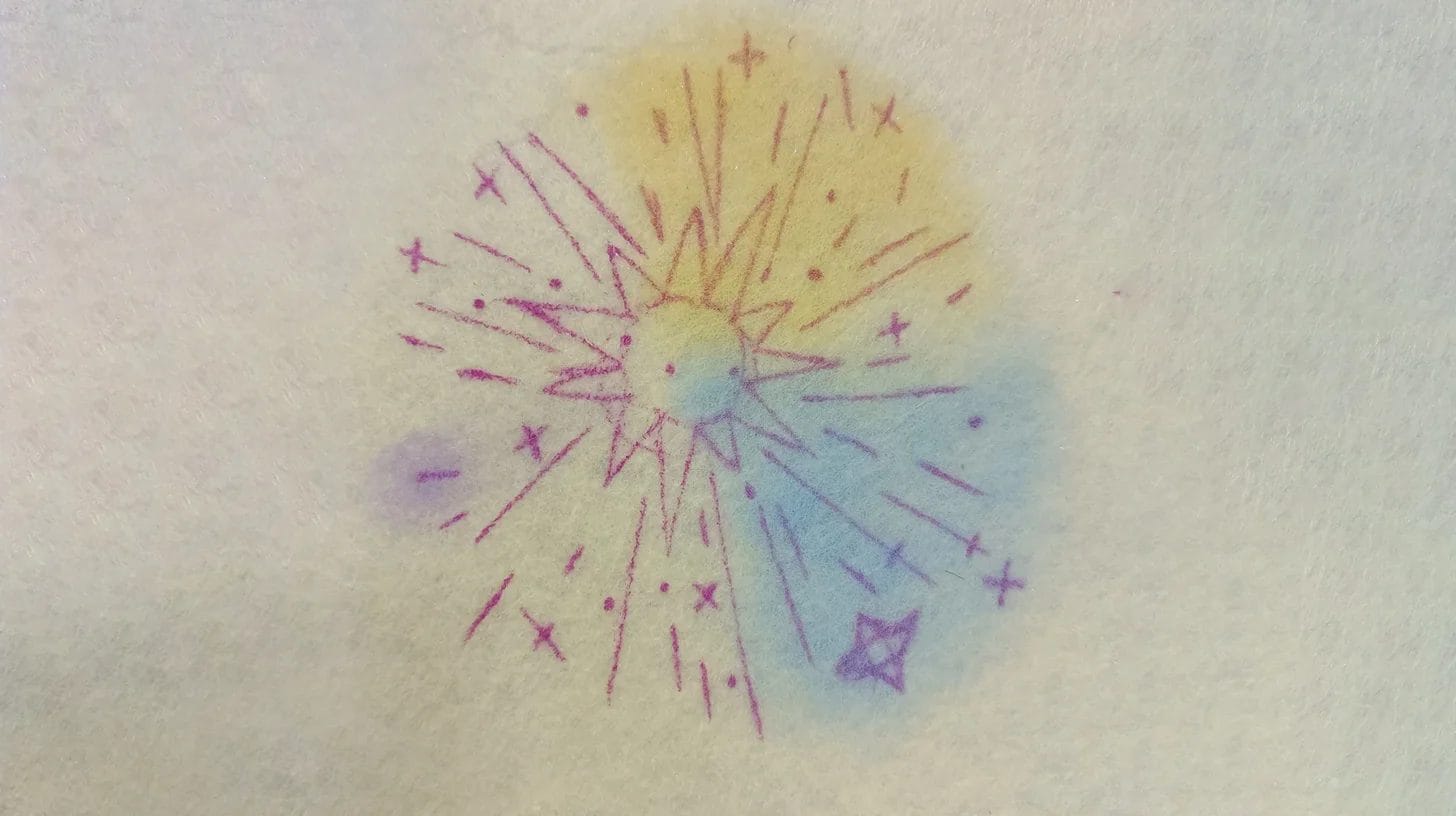
Pick up your eyeshadow and start adding colors to your fireworks. You can separate your fireworks into several parts and add different colors. Color these parts gradually for a subtle effect.
Experiment with different colors and techniques to achieve the desired look for your felt ornament. Use a small brush or applicator to apply the eyeshadow with precision and control, ensuring that your shading is even and precise.
Step 3: Sew the fireworks lines
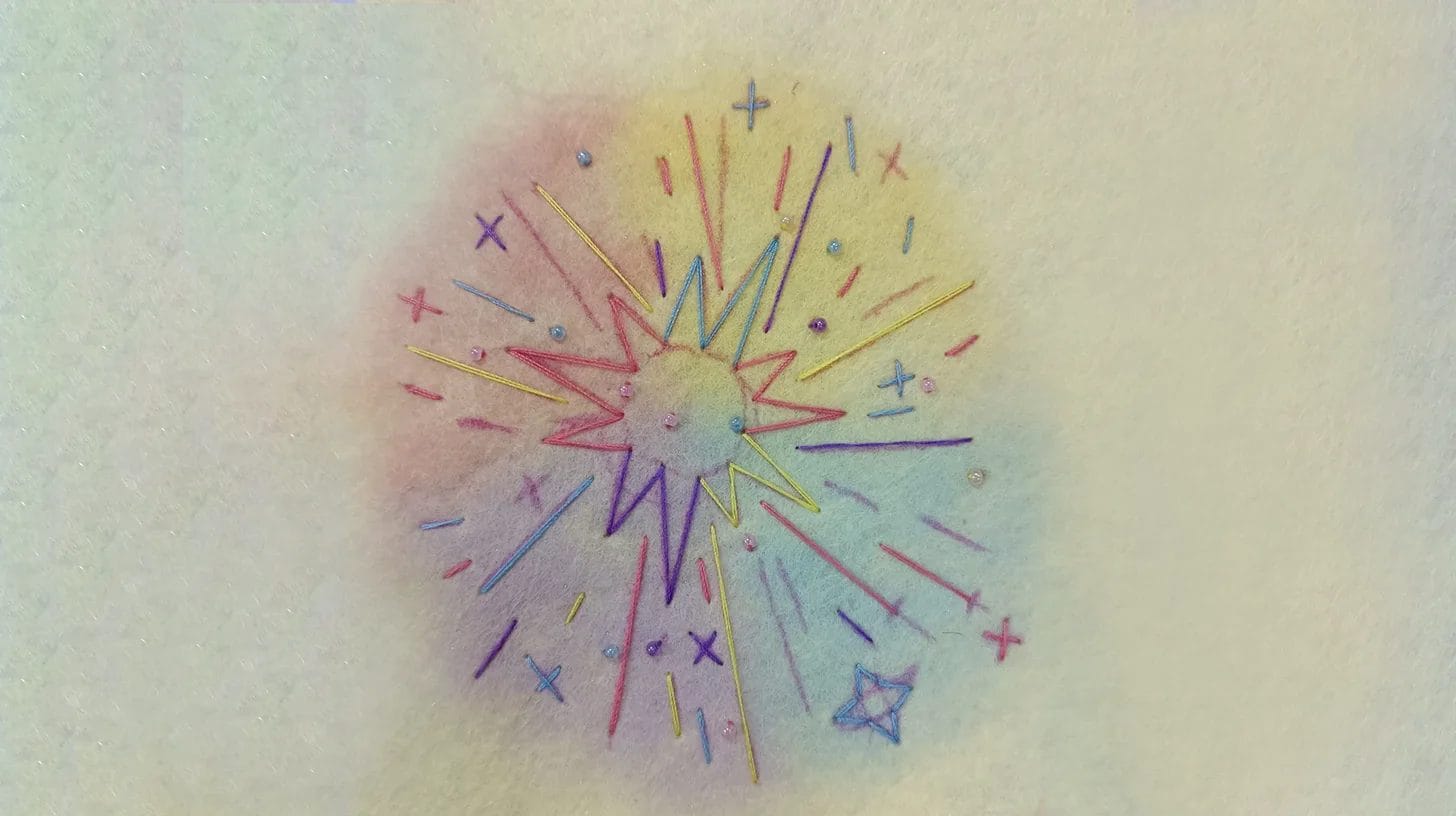
Using various threads, start sewing the fireworks lines on your felt ornament from the center of the burst, working your way outwards to create a vibrant and dynamic design.
Experiment with different colors and thicknesses of threads to create unique fireworks designs. Try practicing different stitching techniques like running stitch or backstitch to add varied textures to the lines.
Secure the threads with knots at the back of the ornament to keep them in place.
Step 4: Add beads as decoration
After stitching the fireworks lines, add some extra sparkle to your ornament by attaching beads to create a unique and eye-catching decoration. Use thread to securely attach the beads to the felt.
Choose beads in various colors and sizes to create unique designs on the ornaments. Scatter them randomly.
Adding beads will enhance the overall look of the felt ornaments and make them more visually appealing. This embellishment will elevate your ornament from simple to stunning.
Step 5: Cut out your fireworks and add an extra felt piece
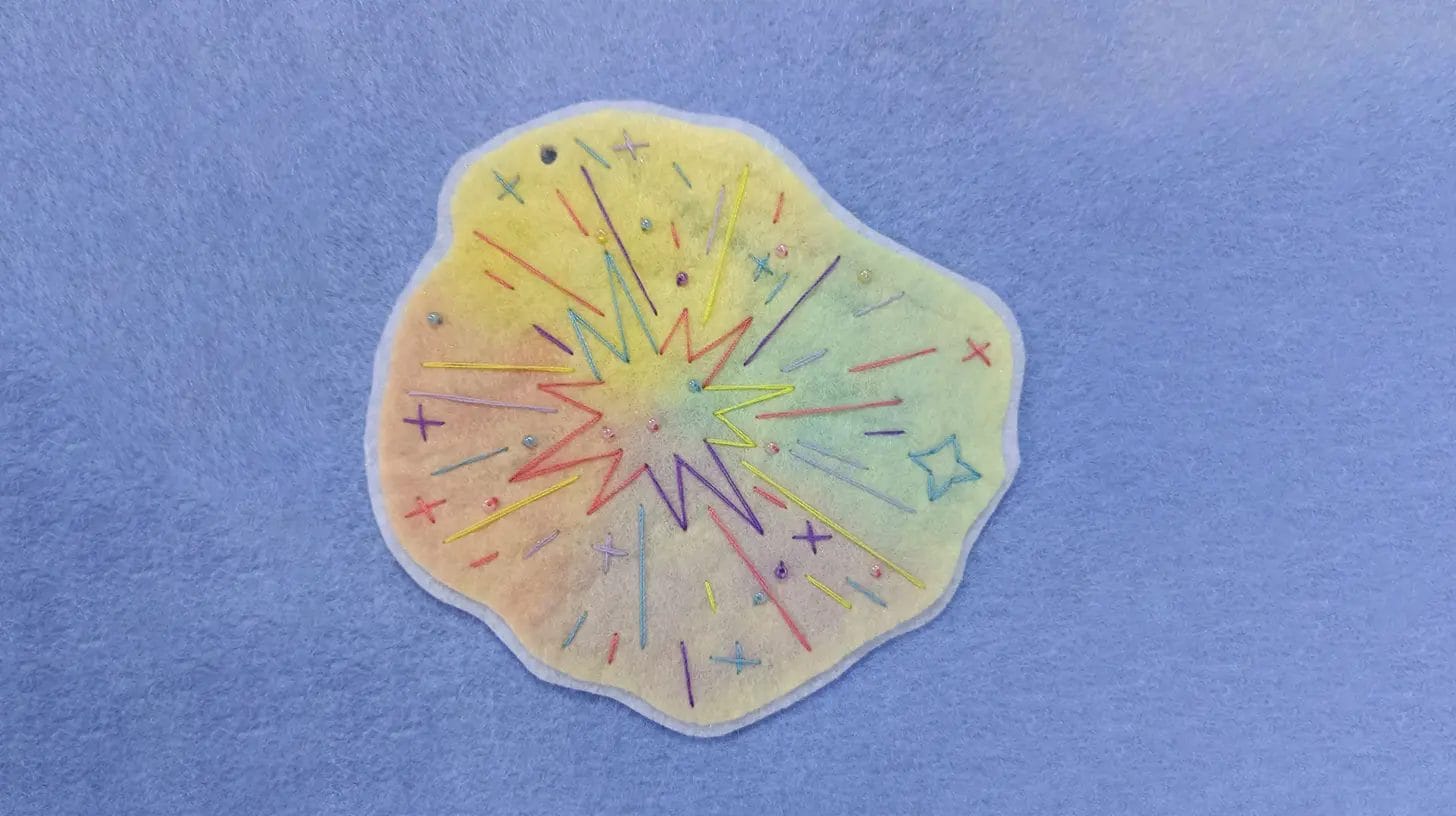
To get started, use sharp scissors to cut out the pattern, making sure to create precise shapes and clean edges. Then, punch a hole at the top of the pattern for hanging.
Next, take an extra piece of felt and glue the bottom part of the fireworks pattern onto it. Cut out this second felt piece, ensuring it's slightly larger than the pattern.
After cutting, mark the first hole on the second felt piece and then punch the second hole. Finally, glue the other half of the pattern onto the bottom piece.
Step 6: Add the third layer of felt
Choose the third layer of felt in a different color. Repeat the same gluing, cutting, and punching techniques. Then, you can achieve a perfect felt fireworks ornament.
With this step, you've completed the basic construction of your felt ornament, and it's now ready for personalization and decoration.
Step 7: Sew a decorative edge

You can sew a circle of contrasting thread around the outermost edge to give your ornament an extra decorative touch. This step adds a beautiful detail to your felt ornament.
Experiment with different thread colors and stitch styles to customize the look of your DIY felt ornament. Tie your string or ribbon through the hole and hang it proudly in your bag or any room.
Conclusion
You've created unique, handmade felt ornaments that reflect your personal style and theme. With a few simple materials and some creativity, you've crafted intricate designs that will add a special touch to your bag or home decor.
Now, hang your ornaments proudly and enjoy the cheerful atmosphere they bring to you.
Learn more sewing projects from the Longancraft Blog, and dive into the fabric world with Longancraft!
FAQs
Can I use hot glue to attach embellishments to felt ornaments?
You can use hot glue when attaching embellishments, but be cautious, as it can melt or distort felt. Apply a small amount carefully, holding the embellishment in place for a few seconds to ensure a strong bond.
How do I prevent felt from fraying when cutting out shapes?
When cutting out shapes, you can prevent fraying by using sharp scissors, cutting on a stable surface, and applying gentle pressure. For cleaner cuts, you can also use a rotary cutter or a craft knife.
Are felt ornaments suitable for outdoor decoration?
Unfortunately, felt ornaments aren't ideal for outdoor use. They can absorb moisture, leading to damage or discoloration.
Can I use wool or acrylic felt to make ornaments?
Yes, you can! Both types work beautifully, but wool felt is more durable and resistant to pilling, while acrylic felt is more affordable and easy to clean.
How do I store felt ornaments to prevent damage?
For felt ornaments, store them in a cool, dry place away from direct sunlight. For extra protection, consider using acid-free tissue paper or cloth bags.
0 comments